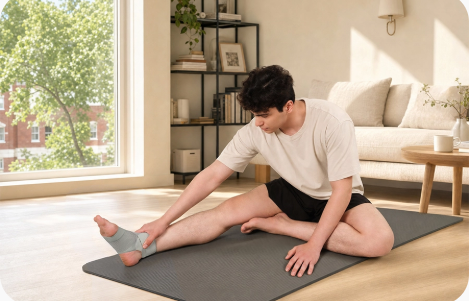
78% of ankle brace and support failures trace back to one thing: wrong size or bad fit. That’s nearly 8 out of 10 people wearing something that isn’t doing its job.
Too loose:
– The brace slides, bunches, or “walks” down your leg mid-run
– Your ankle keeps rolling side to side, exactly what you were trying to prevent
– Ligaments stay exposed to the same stress that hurt you in the first place
Too tight:
– Circulation gets choked off
– Toes go numb, tingly, or change color
– Skin under the strap can redden, blister, even break down into pressure sores
Neither outcome gets you back on the court, trail, or job faster.
That’s what we’re fixing today. We’ll walk through the real ankle circumference measurement method that matches you to the correct fit, not a guess based on your shoe size. By the end, you’ll know how to read an ankle brace size chart, spot the difference between brands, and handle that “stuck between two sizes” panic. No more return labels. No more guessing. Just a brace that stays put when you need it most.
Tools You Need Before Measuring (Measuring Tape, Not a Ruler)
Skip the rigid ruler from your toolbox. A flexible measuring tape is the only tool that gives accurate results on curved body parts like your ankle. A rigid ruler measures only straight lines, so it underestimates curved measurements by 3mm or more. That’s enough to bump you into the wrong size entirely.
Grab a soft, flexible measuring tape, 150 cm if you have one, the kind used for sewing or body measurements. If you find a dual-scale tape with both cm/mm and inch markings, use it — ankle brace size charts vary between metric and imperial. Keep a pen and paper handy to record your numbers immediately; mixing units later causes sizing mistakes.
Before you measure, check your tape for stretched edges or faded markings. Old tape stretches over time, adding 2–3mm of error you won’t notice until your brace doesn’t fit.
Step-by-Step: How to Measure Your Ankle Circumference
Five minutes. That’s all this takes, and it’s the difference between a brace that saves your season and one that ends up in a drawer.
Step 1: Stand up straight.
Weight evenly on both feet. Sitting down changes the shape of your ankle and can shrink your reading by 1-3mm. Small number, but it’s enough to knock you into the wrong size category.
Step 2: Find your landmark.
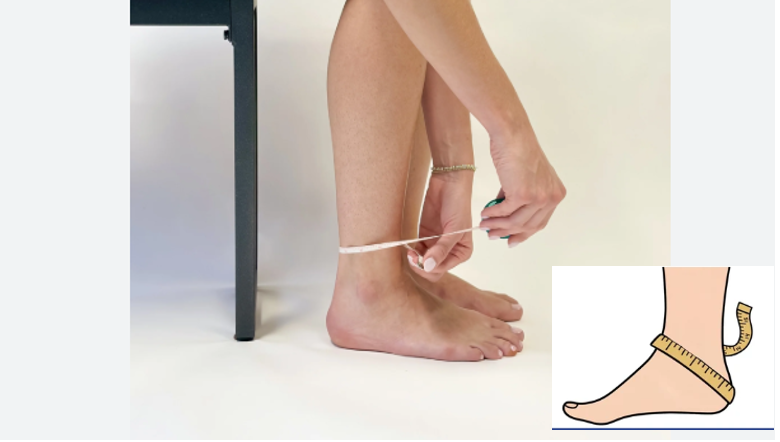
Feel for the bony bump on the inside of your ankle (your medial malleolus) and the matching one on the outside (lateral malleolus). Most ankle brace size charts want your measurement taken right at this level, where the joint is widest.
Step 3: Wrap the tape.
Start the tape at “0” on the front of your ankle and circle it around once, meeting back at the starting point. Keep it horizontal the whole way. A tilted tape gives you a false number every time. (Here’s something worth knowing first: lace-up and stirrup braces measure a diagonal wrap from the heel to instep around the ankle, called the heel-to-ankle oblique. Sleeve-style braces measure straight around the narrowest point of the ankle. The numbers look similar, but they are not interchangeable. )
Step 4: Check your tension.
You should be able to slide one fingertip underneath the tape. Can’t fit a finger? Too tight. That alone can shave 2-5mm off your true circumference. Tape sagging or sliding? Too loose, and you’ll overestimate by the same amount.
Step 5: Read at eye level.
Bend down and look straight at the overlap point. Most adult ankles land somewhere between 17-27cm. Write it down with a decimal if you can (20.5cm beats “about 20”).
Step 6: Do it three times.
Measure, release, and remember. Average the three numbers. This one habit eliminates most sizing mistakes before they happen.
One more thing: measure in the morning. Ankles swell throughout the day from standing and walking, sometimes by more than a centimeter. Measure at night after a long shift, and you might size up for swelling that isn’t even your baseline.
Match the Result with Ankle Brace Size Chart
Here’s your number. Match it below, and you’re done second-guessing.
Most brands cluster around the same core ranges, even if the exact edges shift by a centimeter here or there.
| Letter Size | Ankle Circumference (cm) | Ankle Circumference (in) |
| XS | 23–28 | 9–11 |
| S | 28–30.5 | 11–12 |
| M | 30.5–33 | 12–13 |
| L | 33–36 | 13–14 |
| XL | 36–38 | 14–15 |
This is the standard ankle stabilizer size chart used across the industry. Some brands narrow XS down to 9–10 in. Others stretch XL out to 15 in. The general shape stays the same.
Numbers Instead of Letters?
Some brands skip letters entirely and go with a 1–5 numeric system. There’s no universal rulebook here, but the common logic maps like this:
- 1 = XS (23–28cm)
- 2 = S (28–30.5cm)
- 3 = M (30.5–33cm)
- 4 = L (33–36cm)
- 5 = XL (36–38cm)
Treat that as a starting point.
Why Your Brand’s Chart Might Look Different
Breg runs XXS at 9–10 in up through XXL at 15–16 in. ASO’s X-Small starts at 9–10 in too, but their scale shifts slightly by the time you hit Large. Sports Bracing Australia measures only in cm, and their Large tops out at just 38cm, while other brands put that in their XL range.
The same letter can mean a different fit. That’s the trap.
What to Do If You’re Between Two Sizes
When your measurement falls between two sizes, go bigger, then adjust down. About 90% of shoppers do the opposite.
Footwear brands use the same logic—if your foot measures between two shoe sizes, you size up and add an insole. Ankle braces work the same way. A slightly larger brace can be tightened with straps, extra padding, or a thicker sock. A too-small brace can’t be stretched wider without cutting into circulation.
Compression ankle sleeve size charts flip this logic. Compression gear needs tight contact for graduated pressure. So if you’re between sizes and buying a sleeve for high-intensity training, size down—as long as you can still slide one or two fingers underneath comfortably, with zero numbness or discoloration after 10–15 minutes of wear.
Match your choice to your use case. For active rehab, all-day wear, or post-surgery recovery, size up. Comfort and circulation matter more than max compression. For game day, sprint training, or high-load sport, size down slightly, provided there’s no tingling, cold toes, or visible marking on the skin.
If your ankle circumference fluctuates with swelling or activity level, consider keeping two sizes on hand and rotating based on the day.
Popular Brand Size Charts Compared (ASO, McDavid, Bauerfeind etc.)
Grab two braces from two different brands, measure your ankle once, and you’ll still end up with two different size recommendations. That’s not a measuring error. The brands themselves are working off completely different sizing logic.
| Brand | Sizing Basis | Key Trait |
| ASO | Shoe/clothing size | Direct, universal conversion |
| McDavid | Joint/limb circumference | Bracket varies by product |
| Zamst | Joint/limb circumference | Fit tied to wear position |
| Bauerfeind | Precise circumference grading | Narrow bands, compression-focused |
The takeaway for your ankle brace fit guide: same ankle circumference measurement, different brand, different result. Elastic material, cut, and where they measure the bone landmark all shift the outcome. Always check the brand’s specific ankle support sizing page before converting numbers across products.
Common Measuring Mistakes That Lead to Wrong Sizing
Two mistakes account for most of the “this brace doesn’t fit” complaints out there. Fix these, and you fix your fit.
Mistake #1: Measuring During Peak Swelling
Sprained your ankle yesterday? Don’t measure yet. Acute swelling typically inflates ankle circumference by 4–10%, sometimes spiking to 15–20% within the first 48–72 hours. Say your normal ankle circumference is 23cm. Swell 10%, and you’re reading 25.3cm, right at the edge of a size up. Order based on that number, and once swelling drops back to baseline, you’re left with 2.3cm of loose, sliding brace and zero real support.
The fix: Measure both ankles. If your injured side runs 5–8% larger than your healthy side, you’re mid-swell. Wait 4–5 days, or size based on your uninjured ankle instead.
Mistake #2: Trusting Shoe Size Over Actual Circumference
Two people wearing the same EU 40 shoe can have ankle circumferences 2–4cm apart. One user at 60kg might measure 22cm; another at 85kg could hit 26cm. Same shoe size, different sizing category entirely. Skip the shoe-size shortcut. Measure the ankle itself.
How to Know If Your Ankle Brace Fits After Wearing
The real test happens after you strap in. Wear your brace for 5–10 minutes while standing. Then ask yourself if it feels like a firm handshake. Snug, secure, zero pain. That’s your target sensation.
Check your heels first. It should sit inside the heel cup with no forward-backward slide beyond 3–5mm. Walk for five minutes. If your heel rubs, generates heat, or the cup edge digs into bone, your fit is off.
Wiggle your toes. You need 3–12mm of space between your longest toe and the brace edge. Bend and flex. If material or plastic blocks that motion, the brace runs long or your shoe’s crowding the front.
Run the one-finger test on every strap. Slide a finger underneath. One finger, snug fit, that’s correct. Two or more fingers means loose straps and a brace that’ll slide mid-activity. Zero room, tingling, or numbness means it’s too tight, loosen immediately.
Check your skin 10–20 minutes after removal. Light, even indentation that fades within 20 minutes is normal. Blisters, redness, or persistent marks past 30 minutes mean localized pressure damage.
Watch for “sausage toe.” Swelling, discoloration, or toes colder than your other foot signal restricted circulation. Loosen straps, swap to thinner socks, or size up.
Conclusion
A $40 ankle brace that fits wrong is money wasted—and protection you don’t actually have. Grab your measuring tape, not that stretched-out ruler from your junk drawer. Wrap it around the narrowest part of your ankle, then match that number against the ankle brace size chart. That’s the whole trick.
Three things to remember: measure your bare ankle circumference, not over socks or swelling. When you’re between sizes, size up for comfort or down for compression. Always double-check against the specific brand’s chart, since a “medium” from one manufacturer isn’t universal.
Getting this right means less slipping, less chafing, and a brace that actually stabilizes when you need it most—whether you’re cutting on the court or recovering from a sprain.
For brands, once the fit requirements are clearly understood, the next priority is to ensure sizing curves. AOFIT, your reliable ankle brace manufacturer, can make sure samples are correctly developed on the production side. Also, we support custom sizing and branding options, including, the Use of both centimeters and inches Implement Visual and Video Guidance, Clear Instructions for Edge Cases. If you’re planning to launch a private-label product line, contact AOFIT to explore our solutions.