That knee brace you just bought either feels like it’s cutting off circulation to your foot, or it slides down every time you take a step. Sound familiar? Most knee brace comfort complaints come down to sizing, not the product itself. Knowing how to size a knee brace correctly turns it into a support that stabilizes your joint instead of one that gets shoved in a drawer after a week.
The fix is straightforward, but you need more than a quick glance at a size chart. Below I’ll walk you through the exact knee circumference measurement technique physical therapists use, show you how to match your numbers to a real size chart, and help you figure out whether that snug or loose fit is normal—or a sign you grabbed the wrong size.
What You Need Before Measuring for a Knee Brace
Grab the wrong tool and your numbers will lie to you. Before you even think about a knee brace size chart by measurement, gather what works.
What to use:
– A soft, flexible measuring tape (the cloth or vinyl kind tailors use). It bends around your knee’s curve instead of fighting it.
– No tape measure? A shoelace or string works. Wrap it around your leg, mark the spot, then measure that length against a ruler.
Skip anything rigid. Metal or hardware-store tape measures can’t hug the contour of your knee or calf, and that alone can throw off your knee circumference measurement by a centimeter or more.
What to wear:
Bare skin gives you the most accurate read. If that’s not practical, thin, snug clothing is your only backup—never measure over jeans or thick leggings. Skip lotion that day too; it messes with tape grip.
Timing matters:
If your knee is swollen or inflamed, wait. Measuring during a flare-up inflates your numbers and sets you up for a brace that’s too loose once swelling fades.
Step-by-Step: How To Size A Knee Brace
Three numbers stand between you and a brace that actually fits. Skip any one of them, and you’re guessing. Clinics use this exact measurement guide, and you can follow it in under five minutes.
Step 1: Find Your Patella Landmarks
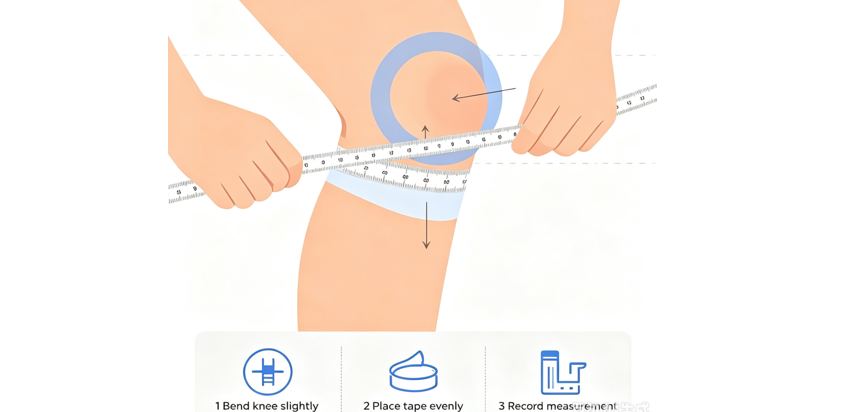
Locate the top edge and bottom edge of your kneecap. Keep your leg relaxed and straight while you find these two points. Don’t lock the joint or bend it. Once you’ve got both edges, mark the halfway point between them. That center spot is your mid-patella line, and it’s the reference point every knee brace size chart uses for the primary circumference reading.
Step 2: Measure the Knee Center
Wrap your soft tape around that mid-patella line. This is your core knee circumference measurement. The tape should sit at the widest point of the kneecap area, snug against your skin but not digging in.
Step 3: Measure 6 Inches Above (Thigh)
From the top edge of your patella, measure straight up 6 inches (15.24 cm) and mark that spot on your thigh. Wrap the tape around that level. Thigh circumference determines how well the upper strap or sleeve stays put, so this measurement is critical for fit.
Step 4: Measure 6 Inches Below (Calf)
Same process, opposite direction. From the bottom edge of your patella, measure straight down 6 inches and mark your calf. Wrap the tape there.
The tape should be firm, not compressing. If you’re leaving an indent in your skin, loosen it.
Step 5: Repeat and Average
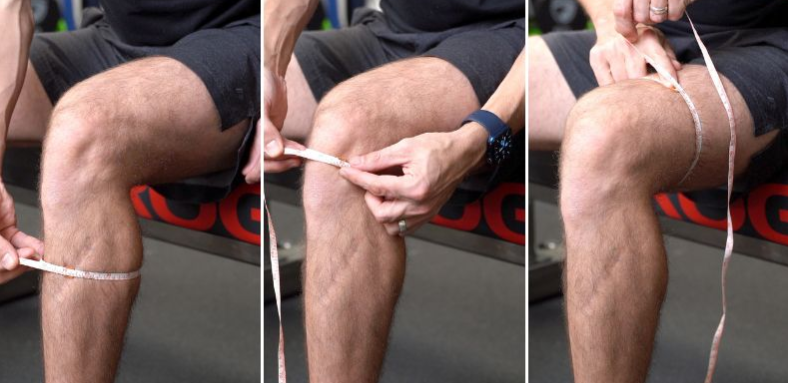
Measure each point twice. If the numbers don’t match, take a third reading and use the average. Tape placement shifts, posture changes, and swelling all throw off a single reading. Doubling up catches those errors before they cost you a size.
Keep the tape level, measure in the same position each time, mark points before measuring, and avoid measuring during swelling or a flare-up.
Some hinged knee orthosis guides ask for five points instead of three: center, plus 10 cm and 20 cm above and below. If your brace model requests that level of detail, use the same landmark-and-measure method. Just add two more marks on each side.
Note: Sizing by Knee Brace Type: Sleeves, Hinged, and Immobilizers
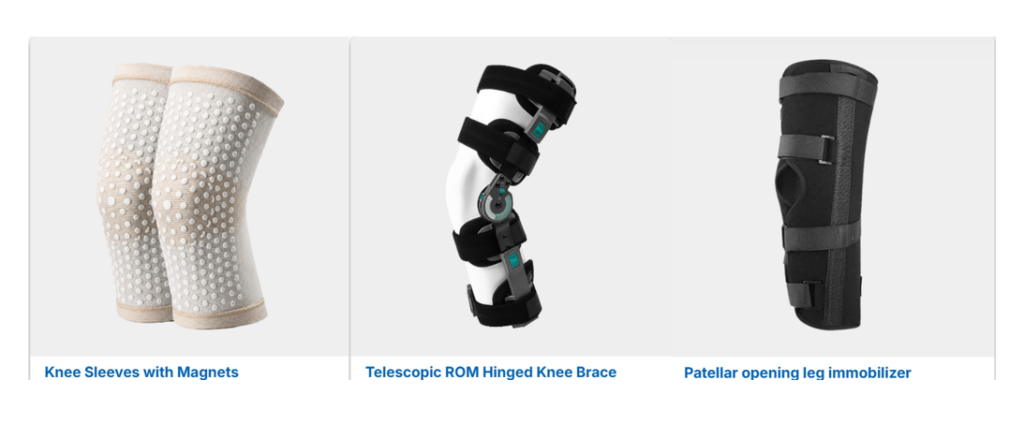
Different types of knee braces need different measurement approaches. A sleeve and a hinged brace serve different jobs, and their sizing methods reflect that.
Compression Sleeves: One Measurement Does the Job
Sleeves are pull-on, tube-shaped supports, so knee circumference alone determines compression and fit. You’re not trying to anchor anything at the thigh or calf. That’s also why sleeves are built for lighter jobs—mild support, warmth, swelling control, everyday activity. Because they have less structure than hinged models, they slide or roll down more easily if you size them loose.
When you measure for a sleeve, bend your knee to roughly 30 degrees, wrap the tape against your skin without compressing it, then check the brand’s specific chart.
Hinged Braces: Three Measurements Are Non-Negotiable
Hinged braces need thigh, knee, and calf measurements because the hinge has to align with your actual joint line. Get one measurement wrong, and the hinge axis drifts off-track during movement.
Here’s what each measurement controls:
- Thigh circumference — Keeps the upper strap anchored. Too loose, and the brace slides down. Too tight, and you get pinching and slippage.
- Knee circumference — Determines fit around the joint itself. Poor fit here means the brace shifts every time you bend.
- Calf circumference — Locks the lower portion in place. Too wide loosens stability; too narrow causes edge pressure.
If any single measurement lands in a larger size bracket, size up on that one. This prevents localized tightness that causes discomfort during extended wear.
Immobilizers: Length Matters as Much as Circumference
Immobilizers add a fourth variable most sleeves and hinged braces skip: leg length. Because their job is holding the knee in a fixed position, coverage from mid-thigh to mid-calf has to match your leg length exactly. Too short, and the brace won’t restrict movement effectively. Too long, and it catches or presses awkwardly when you sit or walk.
Knee Brace Sizing Chart: Matching Your Measurements to a Size
A “medium” from one brand can be a “small” from another. Size labels are meaningless without the right chart behind them. Every knee brace size chart is brand- and model-specific, which means you can’t grab a random chart off Google and expect it to work for your product. Use the official chart tied to the exact brace you’re buying. Period.
Charts Vary So Much Between Brands
Check out how differently five major brands break down their sizing:
| Brand | S | M | L | XL |
| Old Bones Therapy (knee only) | 13–15 in | 15–17 in | 17–19 in | 19–21 in |
| ManaMed (thigh/knee/calf, cm) | 39–47 / 33–35.5 / 30.5–35.5 | 47–53 / 35.5–38 / 35.5–40.5 | 53–59.5 / 38–43 / 40.5–47 | 59.5–67 / 43–48 / 47–51 |
| DonJoy OA (thigh/knee/calf, cm) | 33–39 / 30.5–33 / 25.5–30.5 | 39–46 / 33–35.5 / 30.5–35.5 | 46–53 / 35.5–38 / 35.5–40.5 | 53–60 / 38–43 / 40.5–47 |
| JointBrace (knee/thigh/calf, in) | 12–14 / 16–18 / 11–13 | 14–16 / 18–20 / 13–15 | 16–18 / 20–22 / 15–17 | 18–20 / 22–24 / 17–19 |
Notice the medium range for knee circumference alone swings from 15–17 in to 33–38 cm depending on the brand. It’s a completely different sizing philosophy.
How to Actually Match Your Numbers
If the chart only lists one measurement (typical for sleeves), find where your knee circumference lands and stop there. If it lists three measurements (thigh, knee, calf, common for hinged or wraparound braces), check all three against the same row.
If your numbers span two sizes, DonJoy’s own sizing guidance says to select the larger size if any of the three measurements is a size up. SBD adds another rule: size up if your calf measures more than 1.6 inches larger than your knee. For hinged braces or anything with straps, give more weight to the thigh and calf numbers. Those two points keep the brace aligned; the knee measurement alone won’t save you from slippage.
What to Do If You’re Between Sizes
Your numbers rarely fall neatly into one bracket. When you’re stuck between two sizes, go bigger, especially with rigid or hinged knee braces that don’t stretch. Neoprene sleeves with some give are the exception; those can go either way since the material stretches with wear.
Test before you commit. Try on both sizes and move through real motions like sitting, bending, and walking a few steps. A brace that feels fine standing still often fails the moment you squat or climb stairs.
If one measurement runs bigger while the others fit, size up and use the brace’s straps or closures to tighten the smaller areas. That’s exactly what adjustable knee brace fit systems are built for.
Uneven legs change the math entirely.
If your thigh or calf measurements differ by more than a centimeter between legs, don’t average them. Size the brace to your larger leg. Clinical guidance on leg length discrepancies follows the same logic. Corrections target the shorter or smaller side, not the longer one. A gap under 1 cm rarely needs adjustment. Between 1 and 3 cm, most guides recommend compensating on the smaller side, never forcing the bigger one down. If you’re recovering from surgery or managing arthritis and notice a real leg asymmetry, get it checked before you buy. A brace that fits one leg but binds the other won’t give you a proper knee brace fit. It’ll just relocate the discomfort.
How to Tell If Your Knee Brace Fits
Numbers on a tape measure only get you halfway there. The real test happens once the brace is on your leg and you’re standing, walking, and moving through your normal range of motion. A proper knee brace fit feels firm and stable, doesn’t shift when you walk, and never restricts blood flow.
Signs Your Knee Brace Is Too Tight
Stop and loosen the straps if you notice:
- Tingling or numbness anywhere below the brace
- Constant pain or pain that’s clearly worse than before you put it on
- Cold toes or fingers, or skin that’s turning purple or blue—treat this as urgent
- Red marks that stay visible 30 minutes after you take the brace off
- Numbness lasting more than 15 minutes
Any of these means the brace is compressing circulation, not just applying pressure.
Signs Your Knee Brace Is Too Loose
A brace that’s too loose fails just as badly, only quieter:
- It slides down or rotates while you walk
- You feel gaps along the sides instead of even contact
- The kneecap opening drifts off-center instead of staying aligned with your patella
- It doesn’t stay put even after a few steps
The Fast Fit-Check Method
- Center the kneecap opening directly over your patella.
- Tighten straps from the center outward, evenly on both sides.
- Slide one finger underneath—snug, not loose, not painful.
- Stand up and walk a few steps. It shouldn’t rotate or slip.
- Remove it and check your skin. Persistent red marks mean it’s too tight.
If you notice a new clicking, a sense the knee is “giving way,” or skin irritation that doesn’t clear within 48 hours, readjust the straps or size up—don’t push through it.
Conclusion
Getting your knee brace size right requires patience. Grab a tape measure, wrap it around your thigh, knee, and calf at the right landmarks, and check your numbers against the manufacturer’s chart instead of guessing based on your regular clothing size.
For brands, to decrease the negative reviews, you need wholesale knee braces with clear sizing information. AOFIT, your reliable medical brace manufacturer, supports custom sizing and branding options, including, the use of both centimeters and inches, implement visual and video guidance, clear instructions for wearing ways. Contact AOFIT to explore our solutions.