You’ve just jammed your finger playing pickup basketball, or maybe you woke up with a swollen knuckle and no memory of how it happened. You limp over to the medicine cabinet, and there they are: a roll of athletic tape and that aluminum splint from your last sprain, both staring back at you like equally valid options. Grab the wrong one, and you could be looking at a stiff joint for months instead of weeks—or worse, a fracture that heals crooked.
Buddy tape vs finger splints aren’t interchangeable, and the difference matters more than most people realize. One’s built for flexible support during minor sprains and jammed fingers; the other’s designed for rigid immobilization when bones or ligaments need to stay completely still. Below, we’ll break down when each method applies, how to use them correctly, and the warning signs that mean it’s time to stop DIYing and call a doctor.
Buddy Tape: How It Works, When to Use It, and Why
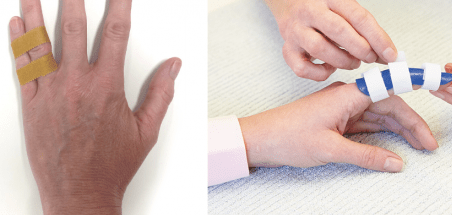
Think of buddy taping as borrowing stability from your own hand. Tape the injured finger to a healthy neighbor, and that uninjured digit provides support, keeps things aligned, and acts as a built-in brace. Unlike a rigid splint, buddy tape doesn’t lock everything down. It stabilizes only the area that needs it while letting the MCP, PIP, and DIP joints keep moving. That’s the idea: controlled motion instead of a frozen joint.
When Buddy Tape Makes Sense
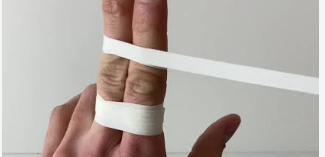
This works best for mild first-degree sprains, nondisplaced stable fractures of the proximal or middle phalanx, PIP joint dislocations that stay put after reduction, and classic jammed fingers in sports where the joint is stable and still has partial range of motion.
If your finger looks reasonably straight — no deformity, rotation, or shifting out of place — and X-rays or a clinician’s exam confirm the injury is stable, buddy taping is usually the right call.
Why Athletes and Trainers Reach for It First
The advantages are practical. You keep joint mobility, which lowers the risk of stiffness from full immobilization. It costs almost nothing and takes seconds to apply, so it works for sideline treatment or urgent care. And athletes who need to keep gripping, passing, or dribbling while healing can keep playing.
When to Skip It
Buddy tape is not a universal fix. Avoid it if you see obvious deformity, displaced or unstable fractures, a dislocation that won’t stay reduced, tendon injuries like mallet finger or boutonnière deformity, or open fractures and wounds.
Buddy tape works well for stable, mild injuries where some movement is safe. For deformity, instability, or tendon damage, you need stronger finger fracture immobilization or imaging first.
Finger Splint: How It Works, Types, and Best Use Cases
A splint locks the injured digit in place with rigid or semi-rigid material. That immobilization protects fracture ends, tendons, and joint surfaces while they heal. Good splinting targets only the affected joint, leaving healthy ones free to move. More rigidity means less chance of secondary displacement, but it also raises the risk of stiffness, skin breakdown, and nerve compression if it’s overdone.
The Main Types
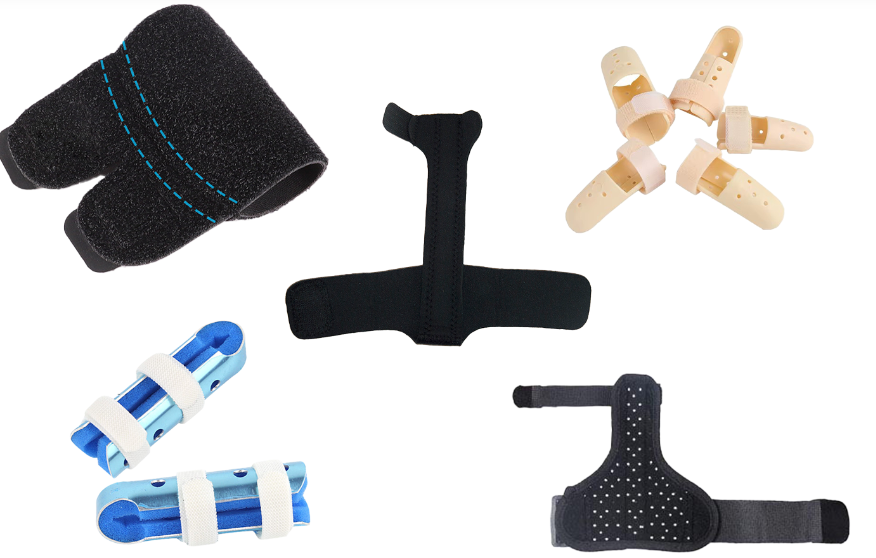
- Aluminum foam splints have a malleable aluminum core wrapped in foam padding. They are cheap, lightweight, and ready off the shelf. These are the go-to for quick ER visits, urgent care, and everyday finger stabilization.
- Custom-fit splints are molded to your exact finger shape. They work better for tendon injuries, repetitive strain, or post-surgical precision.
- Stack splints cover just the fingertip to keep the distal joint straight. They are standard for mallet fingers.
- Gutter splints are U-shaped and wrap the side and underside of the finger for extra stability.
- Dynamic splints are spring-loaded or hinged. They allow controlled movement during later-stage rehab.
When a Splint Is the Right Call
Reach for one with distal phalanx fractures, extensor or flexor tendon injuries (mallet finger, boutonnière, FDP avulsion), DIP or PIP dislocations needing post-reduction protection, and unstable fractures where alignment must hold. Trigger finger sufferers often wear a splint at night to stop the joint from locking. Post-surgical patients use them too, protecting repaired tendons or fixed fractures while tissue knits back together.
The Catch
Don’t leave a splint on indefinitely. Most hand specialists cap immobilization at 3 to 4 weeks. Beyond that, stiffness risk climbs fast. Fit matters just as much as duration. A poorly sized splint can compress skin or nerves, causing numbness or pressure sores. IP joints typically get splinted in extension to avoid long-term contracture.
Buddy Tape vs Finger Splints: Key Comparison Dimensions
Eight dollars. That’s roughly what you’ll pay for either option at the drugstore, and it tells you nothing about which one belongs on your finger. The real differences show up in how much motion you keep, how long you’re stuck wearing it, and whether your injury can tolerate any wiggle room at all. Here’s the breakdown, side by side.
| Dimension | Buddy Tape | Finger Splint |
| Fixation Strength | Dynamic support only, since it relies on the neighboring finger to share the load. Works for stable, non-displaced injuries. | True static immobilization. Built for unstable fractures and dislocations that need rigid control. |
| Mobility Retained | High. The AAFP recommends active range of motion with buddy taping. | Low to moderate, depending on splint type. Designed to limit movement. |
| Comfort | Higher in pediatric randomized studies, where patients rated taping as more comfortable. | Lower, especially with extended wear. Bulkier, more pressure-prone. |
| Best For | Grade 1 sprains, stable non-displaced phalanx fractures, stable PIP dislocations post-reduction. | Displaced/unstable fractures, dislocations that won’t hold after reduction, tendon injuries (mallet finger, boutonnière). |
| Price | Kits start around $8. | Aluminum finger splints run 8–11+, sometimes more for custom molds. |
| Accessibility | Fastest to grab, since tape or self-adherent finger wrap materials are in most medicine cabinets or any pharmacy. | Available too, but sizing matters more. You need the right fit, not just any splint. |
| DIY Difficulty | Low. Both AAFP and Merck list it as a standard at-home or quick-clinic fix. | Moderate to high. Angle, sizing, and wear schedule all require more precision. |
| Recovery Timeline | Typically 2 weeks for stable injuries; some AAFP guidance extends to 3–4 weeks depending on comfort and function. | Often longer or stricter immobilization periods, varying by injury severity. |
| Long-Term Risk | Lower stiffness risk thanks to early movement, though overly tight taping can still cause skin or circulation issues. | Higher stiffness risk from extended immobilization. Poor fit raises odds of numbness or pressure sores. |
Buddy tape wins on mobility, comfort, and ease of use. It’s the best sports tape for fingers when you’re dealing with a classic jammed finger or a stable sprain. Finger splints win on control. When a fracture or tendon injury needs zero movement to heal correctly, rigidity beats convenience every time.
Price won’t make this decision for you, since both options sit in the same ballpark. What matters is matching the stabilization method to how stable (or unstable) your actual injury is, because getting that wrong costs a lot more than eight bucks down the road.
How to Decide Which Fixation Method Fits Your Case
Skip the guesswork. Start with your eyes.
Step 1: Look at the finger. Obvious deformity, rotation, shifting, or a dislocated joint means you don’t reach for tape first. Pediatric emergency guidelines are blunt about this—dislocations or fractures with angulation need reduction before anything else. Buddy tape comes after, to maintain alignment.
Step 2: Check the angle. If the finger’s straight or nearly straight, with angulation under 10 degrees on a middle or proximal phalanx fracture, buddy splinting works as a first-line option per AAFP guidance. Anything steeper, or any rotation, usually needs reduction or surgical input.
Step 3: Consider location. Crush injuries to the distal phalanx skew toward splinting. These typically need DIP joint immobilization for 4 to 6 weeks, not flexible tape.
Different Groups Need Different Approaches
Athletes with mild sprains and full range of motion can buddy tape for 1-2 weeks until pain fades. Contact sports during early recovery are a hard no, even with tape on.
Everyday injuries—minor sprains, stable fractures, no visible deformity—favor buddy tape for reduced stiffness. Significant swelling or instability? Splint first, transition later once swelling drops.
Kids can use either method for simple, non-displaced fractures, but their skin reacts faster. Add padding, check daily for redness or numbness.
The Basketball Finger Scenario
Jammed your finger mid-game? Normal appearance, full movement, mild tenderness—buddy tape to a longer neighboring finger. PIP joint swelling without deformity, confirmed stable by a doctor—buddy tape for 3-4 weeks. Visible crookedness or inability to fully extend—splint or reduction path first.
Combining Both Methods
Many injuries don’t require picking one method forever. Splint acutely, then transition to buddy tape once stability improves—often after 3 to 7 days for simpler pediatric fractures. This reduces prolonged stiffness while still protecting the injury early.
Warning Signs That Mean Stop DIYing and Go to the ER
No tape or splint fixes these. Visible deformity, bone poking through skin, heavy bleeding, or an open wound over a suspected fracture all mean emergency care now, not later. The same goes for numbness, cold or white/purple fingertips, or a finger you can’t move or bear weight on at all.
High-energy trauma—car accidents, falls, crush injuries—gets the same urgent treatment, regardless of how the finger looks. NICE guidelines call for transporting open fractures straight to a trauma center, with debridement within 24 hours.
If swelling and pain stick around after icing and elevation, don’t wait. Get an X-ray within 24–48 hours to rule out a fracture hiding behind normal-looking skin.
Conclusion
Your injury severity decides between buddy tape and a finger splint—not what feels easier. A jammed finger with full range of motion and no visible deformity? Buddy taping gets you back in the game faster, keeping the joint mobile while borrowing strength from its neighbor. But if you’re dealing with a suspected fracture, significant swelling, or that telltale crooked look, a rigid finger splint is non-negotiable. It immobilizes completely while you get imaging done.
Skip the DIY approach entirely and see a doctor or urgent care within 24-48 hours. For everything else, grab the right gear (self-adherent wrap for buddy taping, a properly sized aluminum splint for more serious sprains), follow the step-by-step instructions above, and reassess after 48 hours.