You’re home from the doctor’s office, the discharge papers are a blur, and you’re staring at a knee immobilizer brace on your bed, trying to remember how the nurse wrapped it before you walked out the door. Most people leave with a quick demo and zero muscle memory for the real thing.
This guide breaks down how to put on a knee immobilizer, strap by strap, so you aren’t guessing whether it’s too tight, too loose, or sitting crooked on your leg. You’ll learn the finger-test for proper tension, the order the straps need to go in, and signs like numb toes or a bluish tint that mean it’s time to call your doctor instead of toughing it out.
Check the Knee Immobilizer and Prepare Your Leg
Two minutes of prep saves you from redoing the whole process later. Before the knee immobilizer brace touches your leg, run through a quick checklist.
Straighten and support your leg. Lay your leg flat on a pillow or the bed with your knee completely straight. Don’t try to fit the brace while your leg is bent or hanging off the edge; your alignment will slip immediately.
Inspect your skin. Look over the front and back of your leg, paying close attention to where the brace ends near your groin and ankle, plus the kneecap opening. Check for redness, dark pressure marks, blisters, swelling, or broken skin. These knee splint instructions only work if the skin underneath stays healthy.
Skip the lotion. Bare skin or a thin, snug sock works best under the brace. Creams and oils make straps slip and trap moisture against your skin, which quickly causes problems during days of continuous wear.
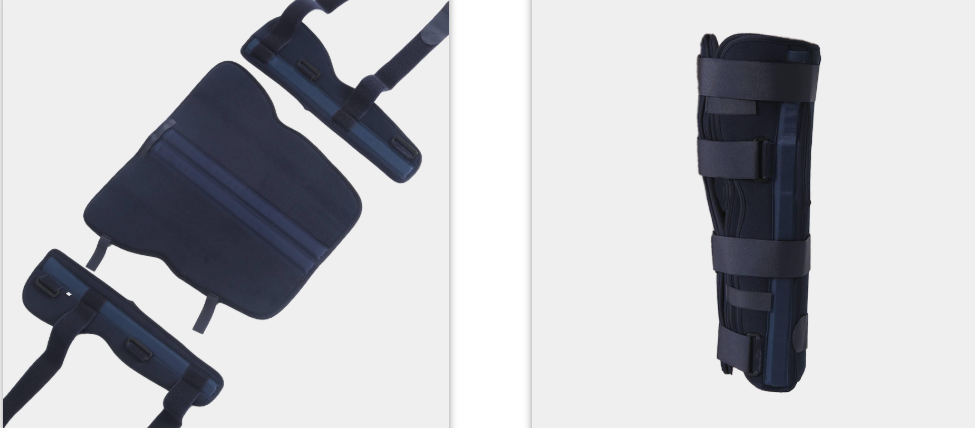
Check the hardware. Lay the brace flat and look it over:
- Padding sits where it should, with no bunching
- Straps and hook-and-loop fasteners grip firmly
- The kneecap opening is clear, with nothing blocking it
- No tears, cracks, or broken stitching anywhere
A damaged strap or shifted pad usually goes unnoticed until you are already strapped in and wondering why something feels off. Catching it now, while the brace is still flat on the bed, is much easier than troubleshooting mid-fit.
Slide the Immobilizer Under the Straight Leg
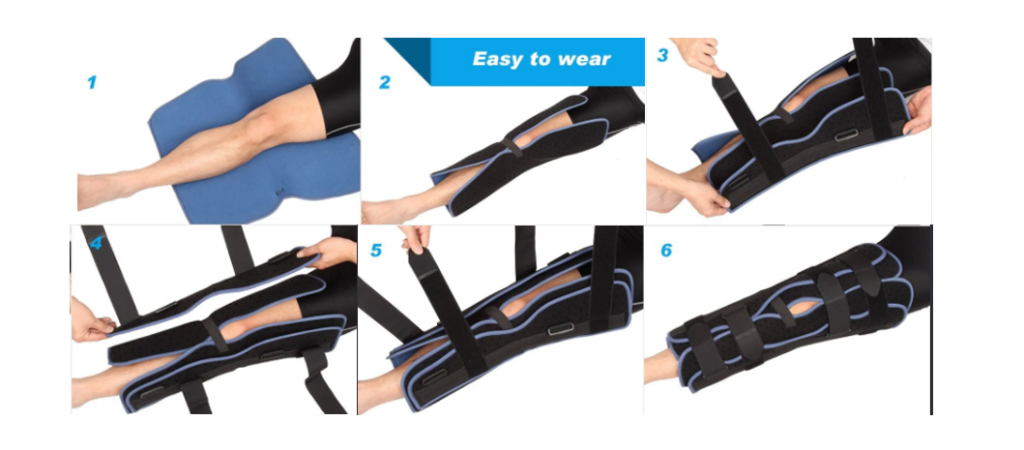
With your leg flat and checked over, it’s time to get the brace underneath it. Keep your knee straight through the whole step, as bending or twisting now undoes your prep work.
Center the pad behind your knee. Slide the immobilizer under your leg so the posterior support or foam pad rests behind your kneecap. This pad is your anchor point for the rest of the fit.
Line up the kneecap opening. Most knee immobilizer braces have a circular cutout for the patella. Center your kneecap in that opening. If your model lacks an opening, find the manufacturer’s printed alignment marks and match those to your knee instead.
Square up the side supports. Run your fingers along the metal or plastic stabilizer bars on either side of the brace. They should sit flush against the inside and outside of your leg, running parallel to your thigh and shin without twisting or angling off.
Why Centering Matters Before You Strap In
Get this positioning wrong, and every strap you tighten afterward locks in that misalignment. Take the extra ten seconds here. It’s faster than unstrapping everything later.
Fasten the Straps Above and Below the Knee First
Skip the ankle and thigh straps for now. The two straps closest to your knee joint—one right above and one right below—lock the brace in place, so fasten those first.
The sequence that works:
- Strap directly below the knee
- Strap directly above the knee
- Lower strap, down toward the ankle
- Upper strap, up near the thigh
Some knee immobilizers come with support and brace manufacturer instructions to alternate instead (below, above, below, above) until every strap is fastened. Check the tag or package insert that came with your brace. Either order works, provided the two straps nearest the joint are secured before you touch the outer ones.
How Tight Should a Knee Immobilizer Be?
Pull each strap snug without cutting off your circulation. As a standard check, slide one finger between the strap and your skin. It should fit with very little give. If you cannot get a finger underneath, you have pulled it too tight. If two fingers slide in with room to spare, take it in another notch.
While you are adjusting, glance down to recheck your kneecap. It should remain centered in the opening, with the hinges running level across the joint instead of angling toward your shin or thigh. Straps tend to shift during the first few pulls, making this your best opportunity to correct any drift before the outer straps lock everything down.
Adjust Each Strap to a Secure, One-Finger Fit
Four straps, four separate checks. Don’t assume the thigh and ankle straps are fine because the two straps near your knee passed the test. Each one needs its own check.
Work through every strap individually. Pull the adjuster or hook-and-loop tab until one finger slides underneath with slight resistance. A second finger shouldn’t fit. That resistance keeps blood flowing while preventing the strap from sliding once you get up and walk.
Most knee immobilizer braces use one of two adjustment styles:
- Hook-and-loop closures let you adjust tension in small increments. Pull the tab back a touch if it feels too snug, or press it down firmly if there is slack.
- Slider buckles let you lengthen or shorten the strap at the adjuster itself. Check the one-finger gap where the strap meets your skin, not at the buckle.
Either hardware style lets you make a quick adjustment with one hand, without unfastening the whole strap and starting over.
Recheck After You Move
A strap that passes the finger test while you’re lying still can shift the moment you sit up or swing your legs over the bed. Move through your normal range of motion—whatever your doctor has cleared—then check each strap again. If one creeps loose and slides around, tighten it a notch. If it pinches or digs in after you move, back it off. Straps that stay anchored without twisting or sliding show your knee splint is fitted properly.
Check Alignment, Stability, and Circulation
A knee immobilizer only works if it sits in a straight line, holds firm when you move, and lets blood flow normally to your foot. Run through all three checks before you call the fitting done.
Look down the length of your leg. The brace should track straight from mid-thigh to mid-shin, with no twist or lean to either side. If the hinges sit crooked or one side rides higher than the other, your knee isn’t centered, no matter how snug the straps feel. Misalignment is especially risky with a post surgery knee brace or any knee brace for ACL injury, where uneven force stresses a joint that is already compromised.
Stand up and test stability. A well-fitted knee immobilizer won’t twist around your leg, slide toward your ankle, or ride up toward your thigh when you shift your weight. If it moves on its own, something is strapped too loose or sized wrong for your leg. Sizing issues show up fastest once you are actually on your feet.
Check your toes next. Press a toenail until it turns white, then let go. Color should return within two seconds. Anything longer points to poor circulation underneath the brace. Compare both feet side by side to make sure the skin looks the same color and feels the same temperature on both sides.
Watch for these warning signs:
- Toes that look pale, blue, or gray
- Skin that feels cold or clammy compared to the other foot
- Numbness or tingling that doesn’t fade within a few minutes of loosening a strap
- New swelling that wasn’t there when you first put the brace on
- A pulse you can’t find at your ankle or the top of your foot, compared to the other side
If you notice any of these signs, loosen the straps right away and check again. If symptoms persist, call your doctor rather than waiting it out.
Fix Common Knee Immobilizer Fitting Mistakes
Even a well-made knee immobilizer fails if it sits in the wrong spot. Most fitting problems come down to a few repeat mistakes that are easy to catch before they cause trouble.
Positioned too low. The brace should run from about 2 inches below your groin to 2 inches above your ankle bones. If it slides down even slightly, it stops locking the knee in place.
Stabilizer bars twisted or crossed. Run your hand along both side bars before you tighten anything. They need to run straight along your leg, not tilt diagonally or cross. Twisted bars press directly into tissue where you do not want force.
Uneven strap tension. Pulling one side tighter makes the brace twist or buckle instead of lying flat. Tighten both sides evenly, a notch at a time, instead of yanking on whichever strap feels loose.
Brace sliding downward over time. If your thigh tapers down to a smaller calf, the brace can slip hours after feeling secure. Check the fit while standing, assuming your doctor cleared you to bear weight, because standing shows slippage that lying down hides.
Skin trapped under padding. Smooth out your pants and the foam lining before closing the straps. Wrinkled fabric or bunched foam behind the knee, at the ankle, or along the calf can cause a pressure sore quickly.
Applied over a bent knee. Unless your brace instructions state otherwise, keep your leg straight before fastening any strap. Fastening it around a bent knee locks in the wrong angle.
Wrong size for your leg. Most brands base sizing on your leg circumference about 4 inches above the middle of your kneecap. If the brace is too small, swap it for the right size instead of pulling the straps extra tight to make it fit.
When to Refit Instead of Pushing Through
Refit right away if the brace slips, pinches, rotates, or causes numbness, cold skin, color changes, or trouble moving your toes. A brace that keeps sliding down when strapped correctly needs a different size, not another adjustment.
Wear the Immobilizer During Sleep, Washing, and Toileting
Always follow your surgeon’s instructions over general guidelines. Some recovery plans require a knee immobilizer only for sleeping and walking, allowing you to take it off for sitting or exercise. Other protocols keep it on around the clock. Check your discharge papers before assuming either way.
Sleeping. If you have clearance to wear the brace at night, keep the straps at the same one-finger tension you used during the day. Do not loosen the straps for comfort. An immobilizer that slips or shifts overnight defeats the purpose.
Washing. Take the brace off for bathing only if your surgeon approved it. Sponge-bathe with warm water and mild soap until you have permission to shower, and keep both your incision and the immobilizer dry. Skip baths, pools, and hot tubs until you have clearance, which often takes about six weeks post-surgery. If your model is removable, wipe it down with a damp cloth and mild soap, then let it air-dry before strapping back in.
Toileting. Keep the immobilizer on unless your care team tells you otherwise. Sit all the way down when transferring to the seat, and take care not to twist your leg or push off at an odd angle.
After any removal, refasten every strap, check your circulation, and call your doctor if you notice numbness, swelling, or discoloration.
Contact a Clinician Immediately for These Warning Signs
Some knee immobilizer problems cannot wait for regular office hours. You need to know when to loosen a strap and recheck, and when to get your doctor on the phone.
Call your clinician right away if you notice:
- Toes that stay pale, blue, or gray after you loosen every strap
- Numbness or tingling that lasts more than 15 minutes after adjusting the brace
- Skin that stays cold or changes color compared to your other foot
- Swelling that keeps increasing instead of settling down
- A pulse you cannot find at your ankle or foot, especially if you felt it earlier
- Skin breakdown, blistering, or an open sore forming under the padding
- Pain that spikes and will not ease up, even after loosening the brace
Go to urgent care or the ER immediately if:
- Your leg looks deformed or misaligned
- You develop a fever along with redness, warmth, or drainage near a surgical incision
- Pain is severe enough that you cannot bear any weight at all, even briefly
Don’t try to tough out these signs or wait for your next appointment. A brace that cuts off your circulation or hides an infection needs medical attention within minutes. When in doubt, call. It’s faster than driving in to find out something went wrong.
Conclusion on how to put on a knee immobilizer
Putting on a knee immobilizer is straightforward once you know the basic sequence. Fasten the straps above and below the knee first, use the one-finger test to check tightness, and check your circulation before you stand up. When you get those three steps right, the brace stays stable, snug, and comfortable enough to wear for hours at a stretch.
You also don’t have to get the fit perfect on the first try. If a strap slips or you spot a gap near your kneecap, go back to the fitting mistakes section and fix it on the spot. You shouldn’t have to call the clinic every time something feels slightly off.
Do call if you notice numbness lasting past 15 minutes, toes turning pale or blue, or pain that keeps getting worse. Adjust the brace first, but reach out to your doctor instead of guessing if something still feels wrong.