You’ve just rolled a fresh ankle, and the doctor handed you a brace with zero instructions—or maybe you bought one online and now you’re staring at a tangle of straps, wondering if you’re supposed to be a physical therapist to figure this out. How to put on an ankle brace correctly makes the difference between real support and a device that slips, bunches, or does nothing when you need it most.
Whether you’re dealing with a lace-up model, a rigid stirrup brace, or a simple compression sleeve, each style has its own fit logic, and getting it wrong is more common than you’d think. This guide breaks down every major brace type step by step, so you can stop guessing and start healing (or preventing the next sprain) the right way.
Universal Ankle Brace Types & Before-You-Start Rules Understanding
Skip the prep work, and even the right brace fails you. These rules apply no matter which style you’re wearing—lace-up, rigid, sleeve, or wrap.
Ankle Brace Types
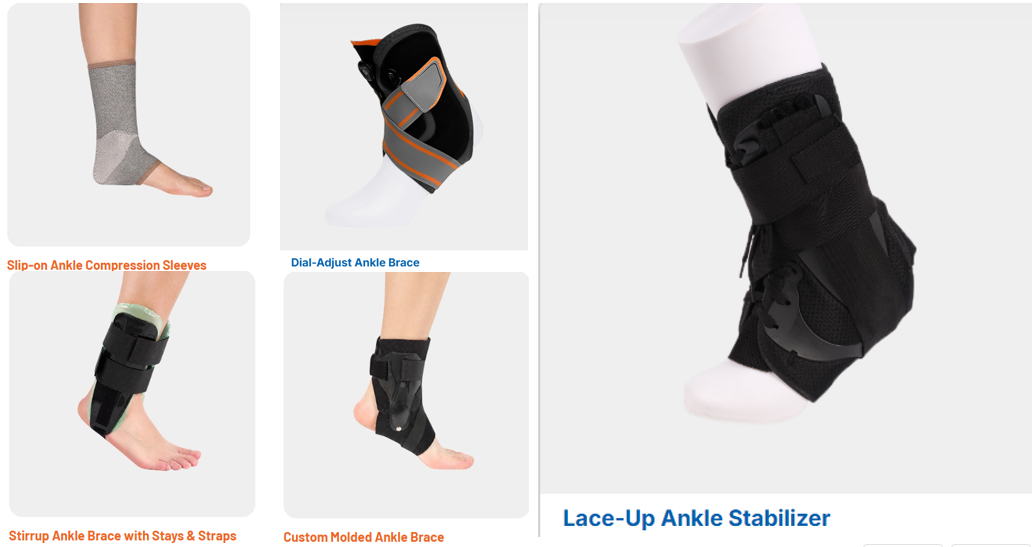
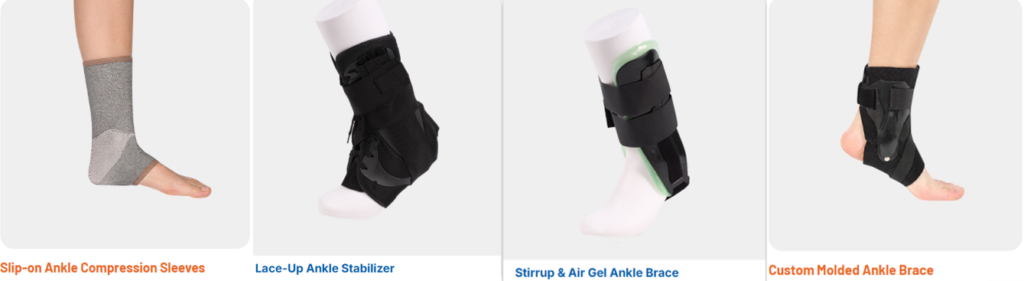
Slip-on Compression Ankle Sleeve with/withour straps
It’s a snug sock made of neoprene or elastic fabric, roughly 2-4mm thick. This is your lowest-support option and most soft sleeves run 10-20 mmHg. They work for mild swelling, as an everyday ankle brace for Grade 1 sprained ankle recovery, or for runners who wear one before a 5-10K and keep it on for an hour after the run to support venous return.
Adjustable neoprene ankle wrap
An adjustable neoprene ankle wrap is a therapeutic support device made of flexible synthetic rubber. It uses hook-and-loop straps to deliver customizable compression and therapeutic heat retention to manage sprains, strains, and joint instability during daily routines or sports.
Lace-Up Ankle Brace
Think soft shoe shell with metal or nylon eyelets running up the front, sometimes paired with figure-8 straps. This ankle stabilizer delivers semi-rigid support, cinching down tighter than fabric alone allows. It’s the go-to pick for basketball, volleyball, or soccer players with a sprain history.
Stirrup-style ankle brace
A stirrup-style ankle brace features two rigid or semi-rigid plastic shells that run down both sides of the ankle and connect under the heel. It stops the ankle from rolling side-to-side (inversion and eversion) while still letting you flex your foot up and down normally.
Common Uses
- Acute Sprains: Stabilizes Grade I, II, or III lateral ankle sprains right after injury.
- Swelling Control: Air or gel pads apply gentle, pulsating pressure to reduce fluid buildup.
- Post-Cast Recovery: Protects the joint during the transition out of a heavy cast or surgical boot.
- Chronic Instability: Prevents weak ankles from rolling during daily activities or sports.
Rigid Ankle Brace (Hinged)
Two hard plastic panels flank the ankle, connected by a hinge that permits up-and-down movement while blocking inward/outward rolling entirely. You’ll feel the plastic shell immediately. It extends 10-15cm above the ankle bone. This is the standard choice for Grade II-III sprains during early weight-bearing recovery.
CAM/Walking Boot
A tall, hard-soled boot reaching mid-calf (25-40cm), built for fractures or post-surgical protection. Nothing else looks or feels like it.
Before-You-Start Rules
- Clean, dry skin first. Sweat and lotion make straps slide. If you’re using a sock, keep it thin and smooth. Thick socks throw off your fit and mess with the tightness check later.
- Set your ankle at 90 degrees before fastening anything. This neutral position is the standard starting point because it lets the brace align with your joint properly instead of locking you into an over-tight, awkward angle.
- The one-finger test is your gold standard. Slide one finger under any strap without pain. If you can’t fit a finger, it’s too tight. If you feel numbness, tingling, pale skin, or a cold foot, loosen immediately. These are your body’s warning signals.
- One-Minute Post-Fit Check. Run through this after every fitting:
- Thin sock in place, no visible skin breakdown
- 20-30° dorsiflexion and 40-50° plantarflexion feel smooth, side-to-side movement stays restricted
- No numbness, tingling, or color change in toes
- Heel centered, no drift after 10 steps
- Shoe accommodates the brace without pinching
- Fit changes once you’re standing and moving, so always recheck after those first few steps.
How To Put On An Ankle Brace?
Different types, Different ways
How to Put On an Ankle Compression Sleeve with Figure-8 Straps
Putting on the Base Sleeve
- Pull the sleeve up over your foot.
- Make sure your heel fits right inside the heel hole.
- Smooth out any bumps or folds in the fabric.
Applying the Strap
- Unfasten the straps: Let all Velcro or wrap pieces hang loose.
- Cross over the foot: Pull one strap diagonally across the top of your foot toward the arch.
- Make a figure-eight: Wrap the strap down under your foot’s arch, then bring it up and around the lower ankle.
- Secure the closure: Press the Velcro down firmly. Adjust the tension so it feels tight and supportive, but not painful or numb.
Where People Go Wrong
Watch for horizontal wrinkles wider than 5mm. Those create pressure points. If there’s a silicone grip band at the top, it must lie completely flat. A folded silicone edge digs in and can restrict circulation.
How to Put On Adjustable Neoprene Ankle Wraps
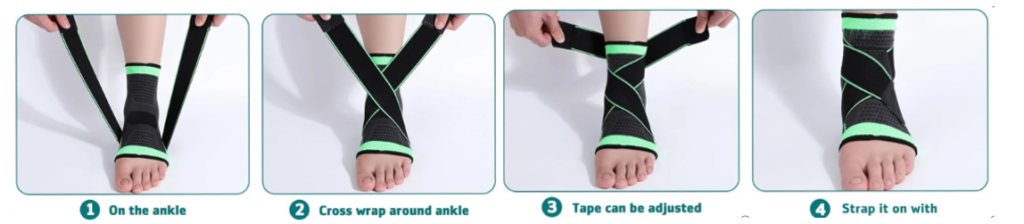
To wear an ankle wrap, open all straps and slide your foot through the main opening. Center your heel in the rear cutout hole, wrap the main neoprene base snugly over the top of your foot, and secure any additional crisscross or side compression straps in a figure-8 pattern.

or

How to Put On a Lace-Up Ankle Brace with Figure-8 Straps
Preparation and Positioning
- Put on a thin athletic sock to protect your skin from irritation.
- Undo all Velcro straps and loosen the laces or speed-laces wide open.
- Smooth out the fabric tongue inside the brace so it sits flat over the front of your foot.
- Slide your foot into the brace, making sure your heel fits snugly into the rear heel hole or pocket.
Lacing and Tying
- Pull the laces tight from the bottom up to a snug, comfortable fit without cutting off blood flow.
- Tie the laces securely in a bow at the top just like a normal shoe.
- For speed-lace models, pull the vertical pull-tabs or side cords firmly outward and secure them to the side Velcro panels.
Securing Support Straps
- Take the first side strap, cross it down over the top of your foot, run it under your arch/heel, and pull it up the opposite side to attach to the Velcro.
- Take the second side strap, cross it in the opposite direction over the top of the foot, under the arch/heel, and secure it up the side to form a supportive “figure-eight”.
- Fasten any top wrap or elastic cuff across the front ankles to lock all the strap ends in place.
- Slip a finger under the top and bottom edges to verify the brace is secure but not painfully tight. Put on a roomy athletic shoe over the brace.

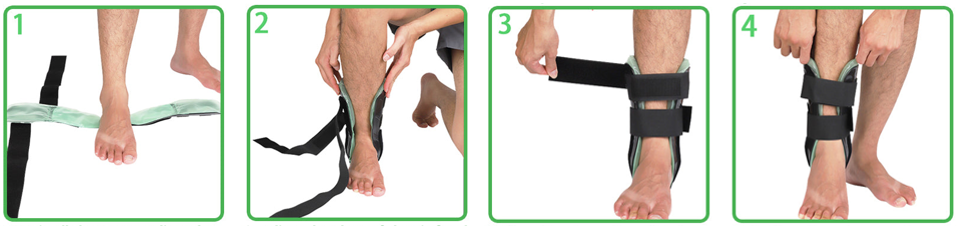
How to Put On Stirrup-Style Braces
Applying the Brace
- Place the bottom curved plastic piece directly under the center of your heel.
- Line up the rigid plastic sides (stirrups) so they run vertically up the inside and outside of your lower leg and ankle, covering your ankle bones properly.
- Hold the plastic shells centered against your ankle with one hand.
Securing the Straps
- Fasten the lowest strap (the one closest to your foot/heel) first. Pull it snug, but not so tight that it hurts.
- Fasten the upper straps moving from the bottom up.
- Press down firmly on all Velcro sections to make sure they lock in place.
- Check the fit: You should be able to slide one finger under the straps, and the brace should stop your ankle from rolling side-to-side while still feeling comfortable.
Wearing with Shoes
- Slip a lace-up shoe, sneaker, or athletic shoe over the entire brace.
- Lace or strap your shoe up securely. The shoe helps hold the plastic stirrup shells tightly and correctly against your ankle during movement.
How to Put On Semi-Rigid Hinged or Rigid Shell Braces(Walking Boot included)
Hinge and Shell Alignment
Center the hinge directly over your joint line, roughly at the midpoint between your inner and outer ankle bones. The shell itself should run from about 5-8cm above the fibula down to mid-heel, without pressing on the fibular head or metatarsal heads. Your ankle bones need to sit 5-10mm inside the shell’s edge, never against the hard rim itself.
Putting On the Boot-Style Shell
- Sit down with your knee slightly bent so you can see what you’re doing.
- Undo every strap and open the front panel.
- Step your heel into the boot like a ski boot, seating it in the heel cup with your Achilles centered.
- Tighten the tongue-lacing bottom to top, keeping about a finger’s width of space over your shin.
- Wrap the first figure-8 strap (roughly 5cm wide), then repeat with a second layer for double stability against front-back drawer and inversion/eversion.
- Finish with the horizontal strap across both figure-8 layers.
Tension order matters: secure the strap nearest the joint first, then work outward. Aim for two fingers of space under each strap.
Walking Boot Air Bladder
Inflate gradually, small pumps at a time, until pressure feels even around your calf with no shifting inside the shell.
After Fitting
Walk 20-30 steps. Watch for limping, uneven stride length, or a heel-height mismatch beyond 10-15mm between your booted and bare foot—that gap alone can trigger hip or back pain over time.

Common Mistakes That Reduce Ankle Brace Effectiveness
Five mistakes account for nearly every ankle brace complaint physical therapists hear. Catch these, and you’ll dodge the blisters, the numbness, and the “it just doesn’t work” frustration.
Skin left bare
No sock underneath means friction. After 30-60 minutes of activity, expect redness, heat, and small blisters tracking along strap lines, especially near the Achilles and below the outer ankle bone. Always add a thin, moisture-wicking sock.
Too loose
If you see a gap wider than 3-5mm between skin and brace, or your foot shifts more than 1cm inside your shoe, the brace has stopped doing its job. Straps that loosen themselves within 10-15 minutes of running are a dead giveaway. One trial found unbraced ankles suffered 78 sprains versus 27 in properly braced ones, roughly a 65% risk reduction. A loose brace erases that protection entirely.
Too tight
Numbness or tingling within 5-10 minutes, discolored toes, or strap indentations that last 30+ minutes after removal all signal excessive compression. Stop and readjust immediately. Prolonged over-tightening restricts circulation and slows recovery.
Heel misalignment
If your heel sits more than 5-10mm off-center in the heel cup, the brace’s support point drifts away from your ankle joint. You’ll feel the brace “riding up” or collapsing during movement, and your inversion/eversion control weakens right when you need it most.
Mismatched footwear
Narrow toe boxes or backless shoes crush the brace out of shape, changing how it distributes force. Watch for new knee or hip discomfort after starting brace use. That’s often a sign the shoe-brace combo is off, not the injury itself.
Conclusion
Getting your ankle brace on correctly isn’t complicated once you know your brace type. That small detail changes everything. Whether you’re wrapping a compression sleeve before a run, cinching down a lace-up ankle brace after a sprain, or locking in a rigid stabilizer post-injury, the same rule applies. Snug enough to support, loose enough to move. Skip that balance, and even the best ankle brace for sprained ankle recovery won’t do its job.
For brands, the priority is to ensure clients know how to put on an ankle brace. AOFIT, your reliable ankle brace manufacturer, supports custom branding options, including implementing visual and video guidance and clear instructions for step-by step guide. If you’re planning to launch a private-label product line, contact AOFIT to explore our solutions.