You clicked “add to cart” on that Oval-8 splint, then froze at the size dropdown. Guessing your size means a return label, a two-week wait, and a splint that either cuts off circulation or slides around doing nothing for your finger joint. If your finger is swollen, bent from arthritis, or you don’t own a soft measuring tape, the official sizing instructions feel vague.
How To Measure Your Finger For The Oval-8 Finger Splint? You don’t need special equipment. A strip of paper or a piece of string and a ruler from your junk drawer will get you there. Below, I’ll walk you through how to measure your finger for the Oval-8 finger splint, which joint matters, and what to do when your number lands between two sizes on the chart from the finger splint manufacturer.
Gather the Measuring Tools and Prepare the Finger
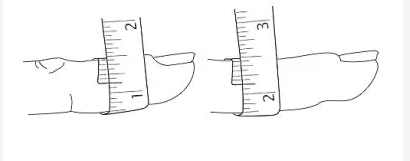
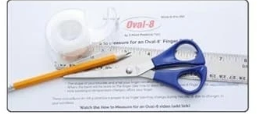
You need a strip of paper about 1 inch wide or a piece of string, plus a ruler or tape measure with millimeter markings.
Before you wrap anything around your finger:
- Remove all rings from the finger you’re measuring. Even a loose ring changes how the paper or string sits.
- Wash your hands in warm water for 30 seconds. Warm water brings blood flow to the surface, giving you a more accurate reading than cold, constricted fingers.
- Wait 10 minutes if you were typing, gripping a pen, or doing repetitive hand work. Finger joints swell with activity, and measuring mid-swelling skews your number.
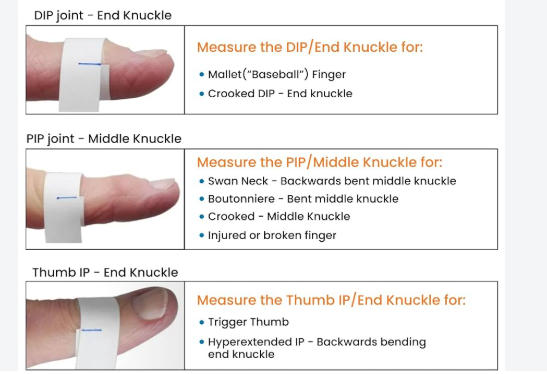
- Identify the correct joint first. Mallet finger splints sit at the DIP (the joint closest to your nail), while swan neck and boutonniere deformities need a PIP measurement (the middle knuckle). Measuring the wrong joint is the #1 reason people land on the wrong Oval-8 splint number.
Lay your paper strip and ruler flat on a table. You’ll need both hands free for the next step.
Identify the Exact Joint the Oval-8 Will Surround
The Oval-8 fits over a specific joint rather than the finger as a whole. If you target the wrong joint, every measurement you take after this will be useless.
Match your condition to the correct joint:
- Mallet finger: DIP joint (the last knuckle, right below the nail)
- Swan-neck deformity, boutonniere deformity, or hyperextension control: PIP joint (the middle knuckle)
- Thumb injuries: thumb IP joint, closest to the thumbnail (or lower for trigger-thumb flexion)
- Trigger finger: MCP joint, where your finger meets your palm
To find the right spot:
- Bend and straighten the finger.
- Notice where it catches, hyperextends, or feels unstable. That is the joint you need to splint.
- Slide the splint over that spot like a ring.
- Position the single band against your palm and the double bands against the back of your hand.
The Oval-8 should stabilize that single joint while your other knuckles remain free to bend. If they cannot move, you have the wrong size or the wrong joint.
Measure Finger Circumference With a Paper Strip or String
Cut your paper strip or string to about 10 cm (4-6 inches). That gives you plenty of length to wrap around the finger with room to overlap.
Wrap it directly around the joint where the Oval-8 will sit. Snug beats loose every time; the strip should hug your skin without pressing a groove into it. Skip dental floss or anything elastic, as stretchy material distorts the measurement and leaves you with the wrong size splint.
To take the measurement:
- Hold one end of the strip against your finger.
- Wrap the rest around the joint until it meets the starting end.
- Mark the overlap point with a pen, right where the strip completes the circle.
- Flatten the strip and measure from the starting edge to your mark in millimeters.
That number is your finger circumference, which Oval-8 sizing charts use to find your fit.
Measure at least twice at different times of day, since swelling changes between morning and evening. Taking three readings over separate days gives you the most reliable baseline, especially if arthritis or an injury causes your joint size to fluctuate.
If you need the diameter, divide your circumference by 3.14. A 57mm circumference works out to an 18.2mm diameter, which helps if you are cross-checking against a finger splint chart that lists both numbers.
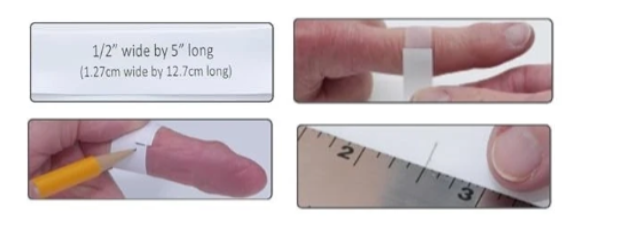
Use the Printable Oval-8 Sizing Guide Correctly
Skip the string-and-ruler method and use Oval-8’s free printable sizing guide instead. It gives you a more precise measurement and accounts for swelling. Make sure you print it at 100% or Actual Size rather than “Fit to Page,” because default printer scaling will distort the template and give you the wrong number.
Cut along the dotted outline. You will end up with a long paper tab that has a notch cut into it. Leave that notch intact, as you will need it to measure.
Align and wrap:
- Center the notch over your joint (DIP for mallet finger, PIP for swan neck or boutonniere).
- Wrap the tab around your finger and thread it through the notch.
- Pull gently until the paper sits flush against your skin, then mark where it crosses the “measure from” line.
- Pull a second time with firmer tension and mark that overlap point too.
- Measure both marks to the nearest 1mm or 1/16 inch.
These two marks give you your size range. The lighter mark shows your loose-fit number, and the firmer mark gives your snug-fit number. If your marks fall between 2 7/16″ and 2 11/16″, for example, you land in the sizes 8–10 range on the chart below.
| Oval-8 Size | Circumference |
| 2 | 4.3 cm |
| 5 | 5.27 cm |
| 9 | 6.35 cm |
| 13 | 7.65 cm |
| 15 | 8.2 cm |
Once you choose a size, try it on to check for good circulation. You should not experience any numbness, tingling, or discoloration. If your swelling fluctuates throughout the day, move toward your looser mark.
Match the Measurement to the Oval-8 Splint Size Chart in Millimeters
The chart covers fourteen sizes, numbered 2 through 15, with each mapped to a specific circumference in millimeters.
| Oval-8 Size | Circumference (mm) |
| 2 | 43 mm |
| 3 | 45 mm |
| 4 | 49.5 mm |
| 5 | 52.7 mm |
| 6 | 57 mm |
| 7 | 58.6 mm |
| 8 | 61.4 mm |
| 9 | 63.5 mm |
| 10 | 68.2 mm |
| 11 | 70.9 mm |
| 12 | 74 mm |
| 13 | 76.5 mm |
| 14 | 80.9 mm |
| 15 | 82 mm |
Find your number on the chart to get your size. If you land between two sizes, that is normal, since finger joints are not perfect circles.
When you’re stuck between two numbers:
- 44mm → round down to size 2 (closest chart value, 43mm).
- 50-51mm → size 4 covers you.
- 74-75mm → this is a toss-up between size 12 and 13. Order both if you can, or test-fit before committing.
- Swollen joint today, normal tomorrow? Go with the larger neighboring size. A splint with a little slack still stabilizes; one that is too tight cuts circulation.
The gap between adjacent sizes is often 2-3mm, so precision matters, but so does common sense about how your finger behaves day to day.
Choose the Correct Size When the Measurement Falls Between Two Sizes
A borderline measurement still gives you clear direction once you know how to read it.
When a shoe falls between sizes, you size up because toe room matters more than a snug heel. Finger splints follow a similar logic, but the direction flips depending on what you need the Oval-8 to do.
Base the fit on what the splint needs to do:
- Stabilizing a mallet finger or correcting a deformity: Lean toward the snugger size. The splint needs to hold the joint in position without shifting, and a loose fit undermines the correction you want.
- Managing swelling from arthritis: Lean toward the larger size. Comfort and circulation take priority over a locked-down fit when you wear the splint for hours at a time.
If your condition affects both joints, do not average your DIP and PIP measurements. Pick the size for the joint the Oval-8 will surround.
Adjust the Measurement for Swollen or Deformed Fingers
Arthritis doesn’t play fair, and neither does a swollen knuckle. If your finger is deformed or swells throughout the day, a single measurement will lie to you.
Measure the widest point. Swollen or deformed joints often bulge unevenly. Wrap your strip around the thickest spot the Oval-8 has to clear. If you size for the base of your finger while the joint above it is swollen, you will end up with a splint that refuses to slide on.
Timing wrecks accuracy. Measure your finger circumference in the morning, then again in the late afternoon. Swelling usually peaks by evening, so your largest comfortable reading is your true baseline.
Skip these before you measure:
- Right after exercise or a hot shower
- After drinking alcohol or eating salty food
- When your hands feel cold
Heat and activity inflate your numbers, while cold shrinks them. Either way, the reading is off.
Check both hands. A deformed finger is rarely round, which makes a single circumference measurement less reliable. Measure the matching finger on your opposite hand as a sanity check before finalizing your Oval-8 size.
Check the Finger Splint Fit After Sizing
Your size chart measurements mean nothing until the splint is on your finger. Put it on, then take a few minutes to see how it sits.
Confirm the splint holds the injured joint where it should. For a mallet finger, the DIP joint must stay straight (or slightly extended if that’s your protocol), while the PIP joint right below it moves without restriction. If the splint blocks that neighboring joint, you have the wrong fit.
Check circulation right away. Your fingertip should stay warm and keep its normal color. Press the nail bed, release, and watch how fast the color returns. If it takes longer than 2 seconds, the splint is too tight.
Run a 10-minute wear test. Take it off and inspect your skin. If you see no redness, rubbing, or discoloration, work up toward an hour of wear.
Loosen the splint right away if you notice pain, numbness, tingling, coldness, swelling, blistering, or redness that lingers past a few minutes. Check the fit again whenever swelling changes.
Avoid These Common Oval-8 Measurement Errors
Six measurement mistakes ruin more Oval-8 orders than bad math ever will.
Assuming your ring size transfers over. Oval-8 sizes track U.S. ring sizes only broadly. Size 6 measures 5.7cm and size 10 measures 6.82cm, but a swollen or deformed joint throws that match off entirely. Your ring size and your splint joint need two different measurements.
Ignoring orientation. The splint fits about half a size tighter or looser depending on which end goes on first. Before you order a size up or down, flip it around. That step alone fixes a surprising number of fit issues.
Installing it backward. Double bands belong on the back of your finger, and the single band belongs on the front. Swap them, and even the correct size feels wrong.
Testing only while your hand sits still. A splint that feels fine at rest can choke off circulation once you bend, grip, or swell. Test the fit while actively moving your hand.
Landing between sizes and picking one anyway. Order the neighboring size as well. A $10 mistake beats a two-week wait.
Add a Step-by-Step Measurement Diagram
Numbers click much faster once you see them on a hand. Sketch or print a simple front-view finger outline, then drop numbered arrows at each measurement point:
- Arrow 1 – Joint Circumference: points to the DIP or PIP knuckle, labeled “wrap here, flat against skin.”
- Arrow 2 – Measurement Line: a dotted line showing where your paper strip or string overlaps.
- Legend: DIP = joint nearest the nail; PIP = middle knuckle.
Label every number in both millimeters and inches, since the Oval-8 chart runs in mm but most rulers at home default to inches. Add a note underneath: “Measured flat; circumference, not diameter.”
Add a tolerance line to the diagram showing that ±1mm accuracy is normal. Finger joints aren’t perfect circles, so don’t chase a number more precise than your actual anatomy allows. A clear diagram turns a confusing chart into a five-minute task.
Conclusion on How To Measure Your Finger For The Oval-8 Finger Splint
Measuring your finger for an Oval-8 finger splint takes a strip of paper, a ruler, and five minutes at the joint that needs support. You do not need special tools or guesswork about PIP versus DIP, and you will not have to order three sizes hoping one fits.
Measure the specific joint rather than the whole finger, and measure at your worst time of day to account for swelling. If your measurement falls between two numbers on the mm chart, choose the larger size. A looser splint still protects the joint, while a tight one cuts off circulation.
Grab your paper strip, take the measurement, check it against the sizing chart, and order with confidence.