Most compression stocking returns come down to a number measured or read wrong. A size chart is a lookup table, and it works only if what you put into it is accurate. Measuring calf circumference at the wrong time of day can push a customer into the wrong size before the order even ships. Here is how to work through the chart column by column across ankle, calf, thigh, and leg length. You get a five-step measuring routine, a clear way to read the chart, and an explanation of how mmHg compression levels raise the stakes of sizing.
Compression Stocking Size Chart by Ankle, Calf, Thigh, and Leg Length
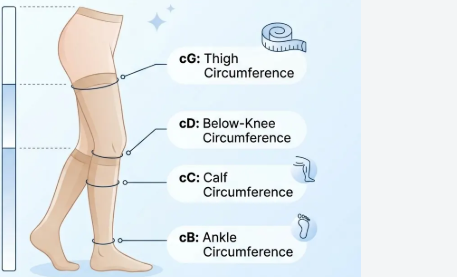
Four measurements determine almost every compression stocking size:
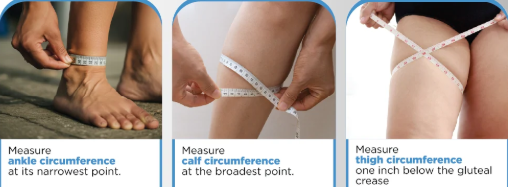
- Ankle circumference: at the narrowest point of the ankle.
- Calf circumference: at the widest point of the calf.
- Thigh circumference: at the upper thigh, right below the buttock fold.
- Leg length: from the floor or heel, up the back of the leg, to where the top band will sit.
The style you choose dictates which measurements you take. Knee-high stockings require ankle circumference, calf circumference, and calf height. Thigh-high stockings require ankle, calf, thigh, and total leg length. Some brands also ask for hip circumference.
Knee-High Chart Example (Commercial Chart)
| Size | Ankle | Calf |
| Small | 7–8.5 in / 18–21 cm | 10–13 in / 25–33 cm |
| Medium | 8.5–10 in / 21–25 cm | 12–15 in / 30–38 cm |
| Large | 10–11.5 in / 25–29 cm | 14–17 in / 36–43 cm |
| XL | 11.5–13 in / 29–33 cm | 16–19 in / 41–48 cm |
| XXL | 13–14.5 in / 33–37 cm | 18–21 in / 46–53 cm |
Thigh-High Chart Example (Commercial Chart)
| Size | Ankle | Calf | Thigh | Leg length |
| Small | 7–8.5 in / 18–21 cm | 10–13 in / 25–33 cm | 15–20 in / 38–51 cm | 27–30 in / 69–76 cm |
| Medium | 8.5–10 in / 21–25 cm | 12–15 in / 30–38 cm | 18–23 in / 46–58 cm | 28–32 in / 71–81 cm |
Circumference ranges overlap between sizes, which is why the ankle measurement usually takes priority when you choose a size.
A Second Thigh-High Chart, With Maximum Length
| Size | Ankle | Calf | Thigh | Max. thigh-length spec |
| Small | 7–8 in | 10.5–14.5 in | 16–22 in | Up to 29 in |
| Medium | 8–9.5 in | 11.5–15.5 in | 17.5–24.5 in | Up to 30 in |
| Large | 9.5–11 in | 12.5–17 in | 19.5–26 in | Up to 31 in |
| XL | 11–12.5 in | 13.5–18 in | 22–28 in | Up to 32 in |
Brand Charts Are Not Interchangeable
A quick comparison between compression socks manufacturers shows that the same nominal size carries very different allowances. For instance, Sigvaris uses these ranges:
- Ankle: small 7.5–8.5 in, medium 8.5–10 in, large 10–11.5 in, XL 11.5–14 in.
- Calf: small 11–15.5 in, medium 12.5–17.5 in, large 14–20 in, XL 16–24 in.
- Thigh-high thigh: small 18–26 in, medium 19–28.5 in, large 20.5–33 in.
Check the specific chart for each SKU. Never borrow one brand’s size chart to buy another brand’s stocking.
Length and Wide-Calf Benchmarks
- Calf length: “short” falls under 16 in, and “long” measures over 16 in.
- Full-leg styles: short falls under 28.5 in, and long measures over 28.5 in.
- Wide-calf options: one commercial chart sets large full-calf sizing at 25–30 in for the ankle and 18–24 in for the calf. Its XL full-calf sizing spans 30–36 in for the ankle and 18–24 in for the calf.
If your measurements cross between sizes, follow the manufacturer’s priority order. Most brands fit the ankle first, followed by calf, thigh, and length. When any circumference exceeds the standard chart, step up to a wide-calf cut or a custom garment.
How to Measure for Compression Stockings in Five Steps
Grab a soft tape measure and set aside for about ten minutes. Measure both legs on bare skin, and write every number down as you go.
Step 1: Pick the Right Time
Measure in the morning, when swelling is at its lowest. If you have to measure later in the day, put your legs up for about 30 minutes first. Keep your foot flat on the floor and your leg relaxed.
Step 2: Measure Ankle Circumference
Wrap the tape around the narrowest part of your ankle, right above the ankle bone. Keep it level and snug against the skin without pulling tight. Record it as ankle measurement B (or cB).
Step 3: Measure Calf Circumference
Find the widest part of your calf and measure the level around it. Record it as calf measurement C (or cC). Some medical-grade fitting systems also take circumferences at set heights: 5, 15, 25, and 30 cm above the ankle.
Step 4: Take the Leg Length Measurement
Keep the tape straight along the leg for both styles.
- Knee-high: Measure from the floor behind your heel, up the back or outside of your leg. Stop about 1–2 finger widths below the knee crease, or at the fibular-head height the brand specifies. Record it as A–D.
- Thigh-high: Measure from the floor up to where the top band will sit, usually 5–8 cm below the groin. Record it as A–G.
Step 5: Add Thigh Circumference When Required
You only need this step for thigh-high styles. Find the widest part of your upper thigh, or mark where the top band will rest. Wrap the tape level and snug, then record it as thigh measurement G (or cG).
Sizing brackets can be narrow. For example, one Sigvaris guide lists ankle ranges of 19–22, 22–24, 24–26, 26–29, and 29–32 cm, with calf ranges running from 32–39 cm up to 44–51 cm depending on the size.
Your Measurement Record
Write down these items before you open a size chart:
- Right ankle, calf, and length
- Left ankle, calf, and length
- Thigh circumference and floor-to-thigh length (for thigh-highs)
- Time of day you measured, and whether swelling was present
Check the brand-specific chart before ordering, because sizing ranges change between product lines and compression classes.
How to Read a Compression Stocking Size Chart by Calf Circumference
A 16-inch calf is Medium on one chart and Large on another. You cannot size these from memory. Look up your measurement each time on the chart for that specific product.
Measure the Calf Before You Look It Up
- Measure at the widest point of the calf. Hold a soft tape level and snug, not tight. A piece of string laid against a ruler works too.
- Measure both legs. If they differ, use the larger number.
- Measure in the morning, before swelling builds.
- If the chart mixes units, record both. 1 in = 2.54 cm.
Read the Chart in Five Moves
- Find the calf circumference column.
- Find the size range that contains your number.
- Check secondary measurements, such as ankle circumference and shoe size. Thigh-high styles may also ask for thigh circumference.
- If measurements point to different sizes, follow the manufacturer’s priority rule. For medical-grade stockings, calf and ankle outrank shoe size.
- If the calf sits near the top of a range, look at the brand’s wide-calf option. Don’t size down.
Calf Ranges Across Brands
| Brand / chart | Calf ranges |
| CEP | 9.5–12 in (25–31 cm); 12.5–15 in (32–38 cm); 15.5–17.5 in (39–44 cm); 18–20 in (45–50 cm) |
| VIM & VIGR standard | S/M: 12–16 in; M/L: 13–17 in; L/XL: 14–18 in |
| VIM & VIGR wide calf | S/M, M/L, L/XL: 17–21 in |
| Venosan | Small: 29–39 cm; Medium: 33–42 cm; Large: 36–45 cm; X-Large: 39–47 cm |
| General comparison chart | XS: 12–13 in; S: 13–14 in; M: 14–15.5 in; L: 15.5–16.5 in; XL: 16.5–18 in; XXL: 18–20 in |
Worked Examples
- 14 in (35.6 cm): This falls in the overlapping Sigvaris Small, Medium, and Large ranges. Use ankle circumference and the exact product chart to settle it.
- 16.5 in (41.9 cm): This fits Sigvaris Medium, Large, or X-Large, and CEP’s 15.5–17.5 in range. Venosan Medium or Large depends on the ankle.
- 19 in (48.3 cm): This fits Sigvaris Large or X-Large and CEP men’s XL. A 17–21 in a wide-calf model is another option.
- 21 in (53.3 cm): This sits at the very top of the cited wide-calf range with no margin. Look at a full-calf or medical-fit product.
Common Reading Mistakes
- Assuming “Medium” is universal. Sizing brackets overlap across different brands.
- Sizing by calf alone. Medical compression often requires ankle, calf, leg length, and sometimes thigh measurements.
- Leaning on shoe size. Shoe size sets foot length. Calf circumference determines the width of the leg sleeve.
- Sizing down for stronger compression. A stocking that is too small is hard to pull on and can squeeze painfully tight.
- Ordering during swelling. Remeasure first, then choose a range that accommodates the largest circumference you expect.
How mmHg Compression Levels Change Size Selection
mmHg measures the pressure dose. It tells you how much pressure a stocking delivers at the ankle. Graduated compression applies the most pressure there and eases off as the stocking moves up the leg.
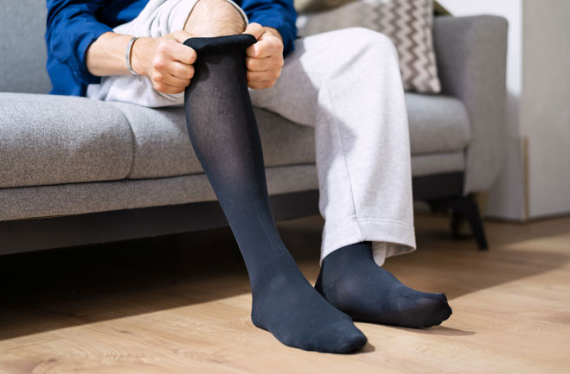
Changing the mmHg rating does not change the nominal size. Ankle circumference, calf circumference, leg length, and (for thigh-highs) thigh circumference still decide fit on the manufacturer’s chart. What changes is the cost of a wrong measurement. Too large, and the stocking under-delivers. Too small, and it can squeeze too hard, injure skin, or restrict circulation.
| Compression level | Common range | Sizing implication |
| Mild | 8–15 mmHg | Standard chart sizing; more forgiving fit |
| Moderate | 15–20 mmHg | Measure ankle and calf accurately; don’t size by shoe size |
| Firm / medical | 20–30 mmHg | Morning measurements, exact brand chart, careful review of borderline cases |
| Extra-firm | 30–40 mmHg | Professional fitting recommended; small errors change pressure substantially |
| Clinical class 1 | 15–21 mmHg | Mild; measurement-based sizing |
| Clinical class 2 | 23–32 mmHg | Exact circumference and length matter |
| Clinical class 3 | 34–46 mmHg | Custom or specialist fitting may be needed for large or irregular limbs |
| Clinical class 4 | 49+ mmHg | Specialist assessment and individualized measurement |
Practical Rules by Situation
- Same ankle and calf measurements: pick the same size the manufacturer lists. Don’t size up because the mmHg is higher.
- Between sizes: don’t guess. Recheck the numbers and confirm garment length. Then follow the brand’s guide, which may point to a short, long, wide-calf, or custom variant.
- Wide calves or large limbs: choose a wide-calf or custom cut. A larger standard size can drop ankle pressure below the intended level.
- Swelling: measure in the morning, before edema builds. Measure the narrowest point of the ankle and the widest part of the calf. Add thigh and leg length when the style calls for them. Knee-highs and thigh-highs require different measurements.
If someone sits at the top of a standard 20–30 mmHg size, moving up a size makes the stocking easier to put on, but it can also reduce therapeutic pressure. For 30–40 mmHg or class 3–4 products, compare wide-calf or custom options against the actual measurements instead.
The rule: higher mmHg raises the stakes of a wrong size. It never replaces the circumference-and-length chart.
Compression Stocking Fit Self-Check After Wearing
Run this check right after pulling the stocking on, then again after a few hours of wear. Even when the sizing chart matches your measurements, you still need to verify the fit directly on your leg.
Right After Putting Them On
- Surface: The fabric should lie flat against your skin. Keep seams straight and watch for bunching, rolling, folds, or wrinkles, particularly around the ankle.
- Pressure: Graduated compression should feel snug and supportive without pinching or cutting off circulation. If the top band rolls down or slips, adjust it right away to avoid creating a tight band of pressure.
- Toes and foot color: Your toes need to keep their natural color and temperature. This applies whether you wear closed-toe or open-toe styles.
During Wear
- Sensation: Take the stocking off if you feel numbness, tingling, pins and needles, or dull sensation. If those symptoms stick around once the stocking is off, call your prescribing clinician.
- Pain: Fresh, worsening, or severe pain in your foot or leg usually means the stocking is too tight or sitting incorrectly. Remove it and contact your clinic.
- Swelling: Look at both legs side by side. Watch for new or increased puffiness at the ankle and toes. If your ankle swells beneath the fabric, the fit needs another look.
- Optional circulation screen: Press down on a toenail or the tip of your big toe until the skin turns pale, then let go. If color takes longer than 2–3 seconds to return, your arterial blood flow may be compromised. Get a medical evaluation.
After Taking Them Off
Check all the skin the stocking covered, making sure to inspect behind your knee and around your ankle bones. Look for redness, indentations, trapped moisture, chafing, or open sores.
- Normal mark: A faint, shallow impression from the fabric that fades shortly after you remove the garment.
- Harmful mark: A deep or painful groove, skin discoloration, or an indent that stays visible while your leg swells. These point to excessive or uneven pressure.
- Skin warning signs: Lingering redness, itching, rash, blisters, sores, skin tears, localized heat, or spreading inflammation. Contact your clinician about any new skin breakdown.
Take stockings off at bedtime to wash and moisturize your legs, unless your doctor specifically told you to sleep in them.
Urgent Warning Signs
Remove the stocking immediately and get prompt medical care for any of the following:
- Blue, white, or cold toes
- Loss of sensation
- Severe pain
- Rapidly worsening swelling
- New wounds
- Shortness of breath
Conclusion
A compression stocking size chart is a lookup table, and it only works when the numbers you feed it are accurate. Measure in the morning, follow the five steps, and let ankle and calf circumference lead when reading the chart. When a customer lands between sizes, use the rule from the article instead of guessing. Remember that higher mmHg levels raise the stakes of a wrong size, and run the post-wear fit check before anyone blames the product.
For your business, the same chart does more work. Once your size ratios, custom chart, and tolerances are set with your supplier, the chart helps train your sales team, shorten customer service replies, and cut returns.
Contact AOFIT to request the B2B Size-Ratio Planning, Custom Charts, and OEM Quality Control.