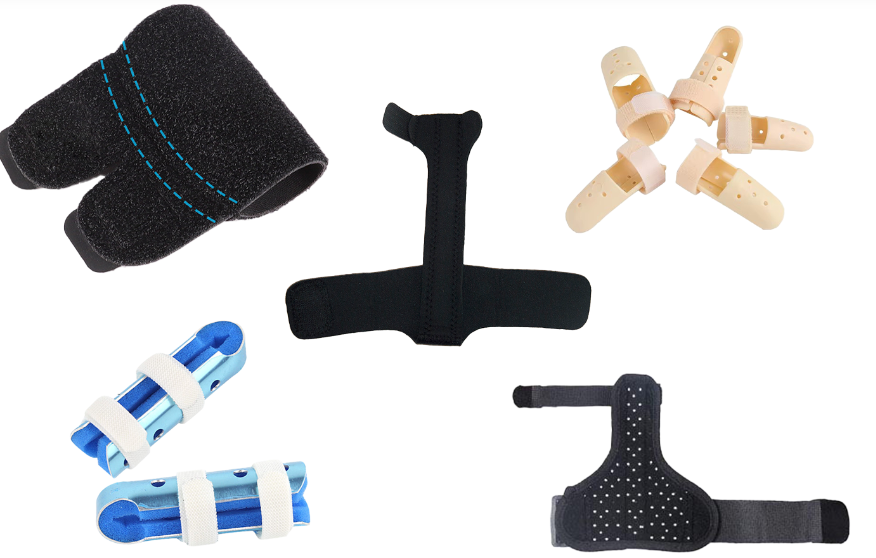
Jammed your finger playing basketball? Can’t straighten the tip after slamming it in a car door? Finger injuries don’t all take the same fix, and grabbing the wrong splint off the pharmacy shelf can slow your recovery or make the damage worse.
A mallet finger splint works nothing like buddy tape, and what fixes a sprain won’t touch trigger finger or arthritis-related stiffness. The shape, material, and rigidity all matter.
Below, we break down which finger splint types match which injuries, how to measure for a proper fit, and the wear-time rules you need to follow so you get the right support on your finger.
Mallet Finger (Drooping Finger/Unable to Straighten) Splint Selection
A finger that won’t straighten at the tip joint isn’t something you tape and ignore. A mallet finger splint locks the DIP joint into full extension (or slight hyperextension) while leaving the PIP joint free to bend. Get that balance wrong, and you either stiffen the whole finger or let the tip droop right back down.
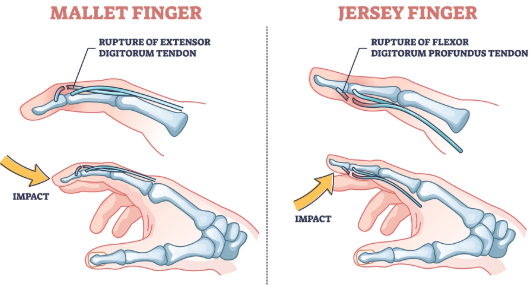
Match the Splint to the Injury
| Splint Type | Material | Best For | Key Consideration |
| Stack splint | One-piece molded plastic | Mild-to-moderate soft tissue mallet finger, no rotation or complex fracture | Must match fingertip width and length. Too tight compresses tissue; too loose lets the DIP flex |
| Aluminum finger splint | Foam-padded, bendable aluminum | Significant swelling or when custom options aren’t available | Adjustable but bulkier; check the foam for moisture or edge fraying |
| Prefab plastic splint | Thin thermoplastic or injection-molded | Isolated DIP extensor tendon injury or small, stable avulsion fracture | Choose a design that leaves the PIP joint free to move |
| Custom thermoplastic splint | Heat-molded by a therapist | Severe swelling, deformity, sensitive skin, or repeated Stack splint slippage | Best fit and pressure distribution, but requires therapist fitting and follow-up |
Bony mallet injuries usually need around 6 weeks of continuous wear. Soft tissue mallet finger runs closer to 8 weeks, adjusted based on imaging and clinical review.
When a Standard Splint Isn’t Enough
Open wounds, displaced fractures, joint subluxation, or a DIP joint that cannot be passively straightened call for an orthopedic or hand surgery evaluation. Do not try to force a fix with a drugstore Stack splint.
If the splint rotates, slides, or lets the DIP droop the moment you take it off, resize it or move to a custom thermoplastic option before continuing daily wear.
Jammed Finger / Stable Fracture (Contusion, Mild Fracture): Choosing the Right Splint
Most jammed fingers don’t need rigid immobilization. If the joint stays in place after impact, buddy tape is usually enough.
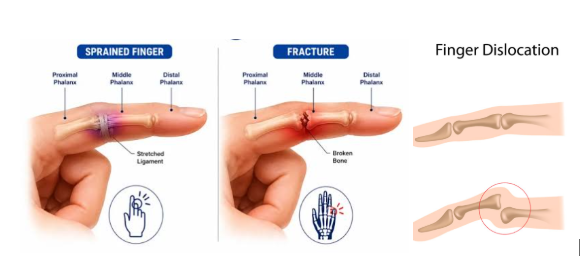
Match the Fix to the Severity
| Situation | First Choice | How to Apply |
| Mild contusion, stable joint, no deformity | Buddy tape / buddy loop | Tape the injured finger to an adjacent healthy finger so the joint stays mobile. Works for mild sprains and stable, non-displaced fractures of the proximal or middle phalanx |
| Confirmed stable fracture with notable pain/swelling | Foam-padded aluminum finger splint, add buddy tape if needed | Used in urgent care for quick temporary stability. Place along the top or palm side to keep adjacent joints still |
| Suspected displacement, rotation, or intra-articular fracture | Temporary splint + prompt evaluation | Do not rely on buddy tape alone. Get at least two X-ray views to check for a fracture, dislocation, or subluxation |
How to Buddy Tape Correctly
- Remove rings first. Swelling will trap them.
- Tape to whichever neighboring finger keeps the injured joint resting straight.
- Place soft padding (gauze, cotton, or foam) between the fingers along the length of the shorter finger to prevent friction and skin breakdown.
- Wrap two narrow strips of tape above and below the joint creases, never directly across the joint.
- Check circulation: fingers should bend together without numbness, tingling, or skin color changes. Loosen the tape if any appear.
- Trim the tape width if it binds or blocks movement.
- Change the padding and tape daily, or sooner if wet or dirty.
Wear Time and Red Flags
Stable injuries usually need 2 to 3 weeks of protection, tapering to use only during physical activity as swelling subsides. Keep uninjured joints moving to avoid stiffness.
Skip buddy tape and get imaging if you notice finger rotation, an abnormal angle, a drooping fingertip, or color changes. Seek prompt care if you cannot bend or straighten the finger, or if pain worsens despite rest and elevation.
Trigger Finger (Snapping Finger/Joint Catching) Splint Selection
A finger that catches mid-bend and snaps free points to an issue distinct from a sprain or mallet injury. Trigger finger originates at the A1 pulley at the base of the finger, right on the palm side of the MCP joint. Because the problem starts there, the most effective splint often targets a different joint than you might expect.
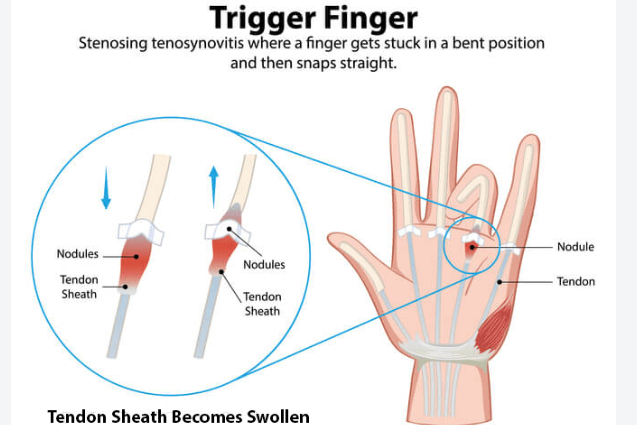
Match the Splint to Where the Catching Happens
| Splint Type | Joint Restricted | Mobility Kept | Best For | Key Spec |
| Trigger finger splint / MCP blocking splint | MCP joint | PIP and DIP move freely | Palmar pain, catching during gripping or bending, nighttime locking | MCP held at 10°–15° flexion; worn 6–10 weeks |
| Short splint (proximal) | MCP flexion | Both IP joints bend normally | Mild-to-moderate trigger finger when you need grip and fine motor control | Must not extend onto IP joints; limits tendon nodule travel through the pulley |
| Oval-8 | PIP joint near full extension | MCP and DIP free | Catching centered at the PIP, or limited PIP flexion/extension | Research protocol: continuous 24/7 PIP immobilization for 6 weeks |
Because a typical trigger finger stems from the MCP, an MCP-blocking splint usually works better than an Oval-8. The Oval-8 leaves the MCP unrestrained. If that joint keeps bending during daily tasks, irritation at the A1 pulley rarely subsides. Save the Oval-8 for symptoms centered at the PIP joint.
Whichever design you choose, you should retain fingertip pinch and DIP motion. Immobilizing joints you do not need to restrict causes stiffness without helping the tendon heal.
Wear Schedule
- Night wear first: Keep the finger straight during sleep to prevent involuntary fist clenching and morning lock-ups. Both the NHS and AAOS recommend this as standard care.
- Trial period: Allow 6 weeks for mild-to-moderate cases, or 6 to 10 weeks when using an MCP-blocking splint.
- Daytime use: Wear the splint during tasks that trigger catching. Skip daytime wear if it gets in the way of your work.
- Check your skin daily for redness, numbness, or swelling. Remove the splint and refit it if pressure marks persist.
Activity Adjustments
- Cut back on forceful gripping tasks: scissors, pruning shears, hand tools, opening tight jars, heavy lifting, or extended mouse use.
- Switch to large-diameter, soft-grip handles, and carry loads with both hands rather than hooking weight onto a single finger.
- Stop testing the trigger by making a tight fist and forcing it straight. That friction irritates the tendon nodule further.
- Break repetitive tasks into short intervals with rest breaks. Scale back if pain or catching increases.
- After taking off the splint, move the finger through an easy, pain-free range. Never force the joint straight.
When Splinting Isn’t Enough
See a GP, hand surgeon, or hand therapist if:
- Catching, pain, or morning stiffness continues after 6 weeks of consistent splint use. Splinting success hovers around 77% when symptoms have lasted under 6 months, dropping to about 44% for longer-standing cases.
- Symptoms interfere with routine tasks like dressing, typing, driving, or handling tools.
- The finger locks in a bent position and requires your other hand to pry it open, or the stiffness becomes fixed.
- You cannot bend or straighten the finger, or your overall range of motion drops from baseline.
- Swelling, tenderness, numbness, or discoloration persists, or the splint causes persistent pressure marks.
- The finger or thumb stops moving. This requires urgent evaluation rather than waiting.
Next medical steps usually involve confirming the diagnosis, trying a corticosteroid injection, or discussing surgical release if locking recurs. If the joint is losing movement and becoming fixed in place, get it evaluated by a doctor rather than relying on splinting.
Arthritis / Joint Instability — Splint Selection
Rheumatoid arthritis, lax ligaments, and chronic osteoarthritis cause pain while pulling joints out of alignment in predictable patterns. There is no universal arthritis splint; you have to match the support to the direction the joint is drifting.
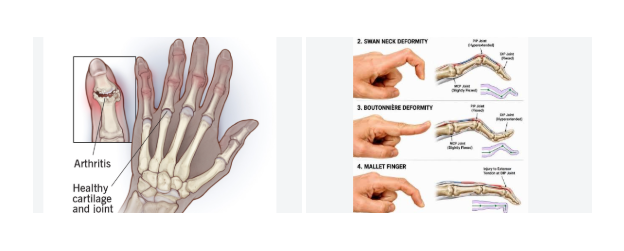
Match the Splint to the Deformity
| Deformity | Mechanical Problem | Splint Approach | Selection Tip |
| Swan-neck | PIP hyperextension, DIP flexion | Ring splint blocks PIP hyperextension while allowing flexion | Choose a ring that stops hyperextension but still permits bending; locking the PIP kills your grip |
| Swan-neck, mild/correctable | PIP still passively flexible | Oval-8, worn reversed or sized to the PIP | Good low-cost trial option; confirm flexion still reaches functional range |
| Boutonnière | PIP flexion, DIP hyperextension | Needs sustained PIP extension without overloading DIP; a plain ring often can’t manage both | Flexible, early-stage cases do better with static or dynamic extension splints; fixed chronic cases usually need custom fabrication |
| Boutonnière, mild PIP lag | PIP extension lag, still passively correctable | Oval-8 as a PIP extension block | Check for DIP hyperextension or pressure before relying on it long-term |
| PIP/DIP instability, painful OA | Axial drift, lateral shear, pain on motion | Ring splint’s three-point support reduces lateral shift | Wear during daytime activity; do not eliminate necessary joint motion |
Quick Triage
- PIP hyperextension dominant: Try a ring splint or Oval-8 hyperextension block first.
- PIP flexion dominant: Use a PIP extension splint. A standard Oval-8 falls short if DIP hyperextension is also present.
- Significant lateral drift, irregular joint shape, or multiple joints involved: Go straight to custom thermoplastic fabrication.
When to Escalate to Custom
Prefab splints fail when the joint is rotated or ulnar-deviated, when joint size falls between standard increments, or when you need to control two joints at once (like PIP hyperextension paired with DIP flexion). Fragile skin, fluctuating swelling, bony nodules, and pressure-sore risk also call for custom fitting. If a prefab splint still hurts, slips, or blocks grip after a proper trial, refer to a hand therapist.
Nighttime custom DIP splints can reduce pain and improve extension deformity without adding short-term stiffness. Daytime splints tend to relieve pain faster, often within 45 days, while nighttime benefits can take up to 12 months to appear. A review of 5 randomized trials (230 participants, 8.1-week average follow-up) found prefab splints outperformed custom options on functional disability scores, with no significant difference in pain, grip, or pinch strength.
Wear Rule: Splint during high-load or unstable activity; use nighttime static wear for deformity correction. Never go a full day without splint-free movement. Build in active flexion and extension breaks daily.
Key Decision Factors: Matching Symptoms to Splint Type in Seconds
Most splint guides leave out prices and symptom checklists, but those two details determine whether you buy the right product on your first trip to the store. Here is the fast-reference guide.
Symptom-to-Splint Quick Matrix
| Symptom | Priority Splint | Watch For |
| Fingertip droops, can’t actively straighten | Mallet/Stack splint (DIP locked straight) | Wear continuously for 8 weeks, followed by ~1 month of night-only use |
| Mild swelling, stable, no deformity | Foam-padded aluminum splint; buddy tape if no fracture concern | Pad between fingers; tape wrapped too tightly cuts off circulation |
| Catching or locking near the knuckle | Trigger finger splint (blocks MCP flexion) | Rule out fracture, dislocation, or tendon rupture if the joint will not unlock |
| PIP hyperextension or lateral wobble | Oval-8 or ring splint | Size to finger circumference; recheck fit as swelling changes |
| Suspected fracture, dislocation, or tendon rupture | Temporary splint + medical evaluation | Buddy tape alone is not enough for unstable or open injuries |
What These Cost
- Basic foam-padded aluminum splint: ~6.79atCVS,~5.43 with ExtraCare Plus discounts.
- Multi-pack aluminum splints: Walmart sells 10-packs around $8.90 (roughly $0.89 each), handy for stocking a first-aid kit across finger sizes.
- Trigger finger or fracture-specific splints: $4.94 to $17.99 on Walmart, with single units often landing between $5.07 and $15.99.
- Custom thermoplastic splints: No fixed retail price. Budget well above the 5–18 OTC range once you factor in therapist fitting, molding, and follow-up visits.
Fast Buying Rule: For temporary protection without any deformity, a 5–10 foam aluminum splint works fine. If you need continuous DIP extension, skip the generic aluminum strip and buy a dedicated Mallet or Stack design instead.
Go to Urgent Care or a Hand Surgeon If You See:
- Visible deformity, rotation, or angulation
- Open wounds or exposed bone
- Numbness, tingling, or inability to move the finger
- Color changes, such as purple, white, or cold skin
- Severe or worsening swelling and pain
- Inability to straighten or bend after injury
Daily Wear and Care: The Checks Most People Skip
Skipping your daily skin check turns a minor sprain into an emergency room visit. No matter which finger splint you use, the fastest way to derail your recovery is treating it like a “set it and forget it” device.
Rings Come Off First, Always
Take rings off the moment you injure a finger, whether from a sprain, a burn, or an allergic reaction. Do not wait for swelling. Injured tissue leaks fluid almost immediately, turning a trapped ring into a tourniquet. Watch for pale, purple, or blotchy skin, numbness, tingling, a cold fingertip, or color that returns slowly after pressing the nail. If you notice any of these signs, the ring is cutting off your circulation. Go to an emergency room to have it cut off instead of wasting ten minutes trying to twist and pull it free.
Check Your Splint Like You Check Your Phone
- Daily wear: inspect at least once, ideally when washing hands or before bed.
- Sweating, swimming, or long workdays: check before and after activity.
- Any splint or buddy tape worn continuously: check twice daily, morning and night.
Compare the splinted finger to the matching spot on your other hand. Look for indentations, redness, blistering, discoloration, or numbness. If redness stays visible for more than 20 to 30 minutes after you loosen the splint, leave it off and call your doctor.
The Core Rule
Immobilize only the injured joint. Keep every healthy joint free to move. Place padding under the straps rather than directly over bone or swelling, and recheck skin color and feeling every time you strap the splint back on.
Frequently Asked Questions (FAQ)
People mix up “brace” and “splint” even in clinical paperwork, but the difference matters when you need the right support.
Finger brace vs splint: what’s the real difference?
Medical charts label both as an orthosis, but rigidity sets them apart. A finger splint uses metal, plastic, or thermoplastic with padding to lock a joint at a fixed angle. Fractures, dislocations, and tendon injuries need that level of control. A finger brace is softer or semi-rigid and allows some movement, which fits sprains, joint instability, or the tail end of recovery. Don’t swap to a brace for comfort alone. Under-immobilizing too early risks re-injury and drags out healing.
Are pediatric finger splints different?
Yes, and size matters more than age. Fit the splint to the finger’s circumference, length, and swelling rather than choosing a scaled-down adult design. Kids’ splints often use thinner material, around 1/16 to 3/32 inch, with smooth edges and no exposed metal. Check the straps for circulation issues, and watch for color changes, numbness, or skin breakdown after every wear.
Can I DIY a splint for a basketball jam?
Only as a short-term bridge to medical care. Buddy tape with gauze between the fingers works in a pinch. Skip DIY if you see deformity, rotation, or an open wound.
What about sleep and showers?
Keep the splint angle intact overnight. For showers, use a waterproof sleeve, or remove a non-waterproof splint and dry both your skin and the splint thoroughly afterward.
Conclusion on Finger Splint Types
Your injury dictates the splint you need. A drooping fingertip calls for a mallet finger splint, a jammed joint needs buddy tape, and aching arthritic joints benefit most from an Oval-8 or custom metal finger splint. The wrong match wastes money and can slow your recovery or make things worse.
Walk into your doctor’s office or the pharmacy aisle knowing what questions to ask and what options exist for your symptoms.
If your symptoms persist beyond 48 hours, swelling worsens, or you can’t bend the finger at all, see a hand specialist. For everything else, use this guide to choose the right support.