
You strapped it on, felt that satisfying snugness, and thought, “Perfect.” Then twenty minutes later, your fingers started tingling, or worse—by evening, your brace felt loose enough to slide right off. Sound familiar? Figuring out how tight should a wrist brace be is trickier than it seems, and getting it wrong isn’t just uncomfortable—it can slow down your healing, or in more serious cases, mess with your circulation and nerve function.
Here’s the good news: there’s a method to this, not just guesswork. A simple wrist brace fitting trick (hello, two-finger rule), the telltale signs your wrist brace is too tight or too loose, and how your ideal fit might change depending on whether you’re typing at your desk, sleeping, or hitting the gym. By the end, you’ll never have to second-guess that strap again.
How Tight Should A Wrist Brace Be? It Depends on Use Case: Daytime, Sleep, and Sports
Not every hour of your day calls for the same tightness. Typing at your desk, sleeping through the night, and lifting weights at the gym each put different demands on your wrist, so your brace shouldn’t feel identical across all three.
Daytime wear is all about staying functional. You want a snug fit that stops harmful wrist bending but still lets your fingers move freely for typing, gripping, or opening a jar. Run the two-finger test here: if you can’t slide one finger under the strap, or if you notice numbness, tingling, skin pinching, or color changes, loosen it right away. Think mild to moderate compression—enough to keep you from bending your wrist the wrong way, but not so much that basic tasks feel like a struggle.
Sleep changes the equation. At night, your goal shifts from mobility to positioning. The brace should hold your wrist in a neutral position for hours without you consciously monitoring it. Go by the one-finger rule here: slightly firmer positioning, but never tighter overall. This matters because swelling increases while you sleep, so a brace that feels fine at 10 PM can feel restrictive by 3 AM. Check that your fingertips stay warm and normal in color before you drift off. The general recommendation is about 8 hours of overnight wear, so this isn’t meant to be a 24/7 solution.
Sports and heavy labor need more security. Movement means your brace has to resist sliding, so aim for a snugger, higher-support fit than daytime wear. Rigid or semi-rigid braces with metal or plastic stays often outperform soft straps here, keeping your wrist neutral under real force. But the same circulation rules apply: if fingers can’t slip in at all, throbbing starts, or fingertips turn pale, blue, or red, loosen it immediately. Too loose, and you lose control mid-motion. Too tight, and you risk restricting blood flow during exactly the activity that demands the most support.
Does a sports wrist brace fit differently than a carpal tunnel one? Yes. Nighttime carpal tunnel splints prioritize a neutral 0–5° position over tightness. Looser is safer than snug here. Sports wraps allow more give; one to two fingers with slight resistance is ideal.
The Correct Tightness: One-to-Two Finger Rule
Physical therapists have a name for this trick, and once you know it, you’ll never fumble with your wrist brace fitting again. It’s called the two-finger rule, and it’s simple.
After you’ve secured the strap, try sliding two fingers between the brace and your skin, right at the point of tightest contact. If they slip in comfortably, without being loose or causing pain, you’ve nailed it. This is the sweet spot orthopedic specialists describe as “snug but comfortable,” and it’s the gold standard for carpal tunnel brace tightness and everyday wrist support strap adjustment.
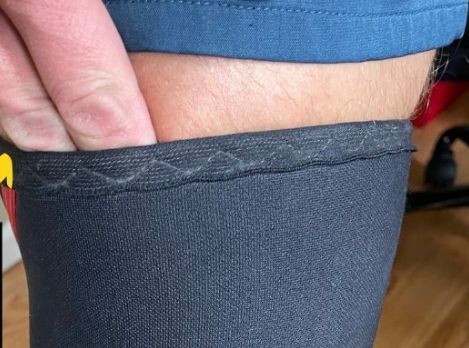
What if it’s off?
- Two fingers slide in with room to spare: too loose. You’re not getting the support you need, and the brace will shift or slide throughout the day.
- You can’t fit even one finger: too tight. This is when circulation and nerve compression become real concerns.
For higher-intensity situations, such as post-surgical immobilization or cases requiring maximum stability, the one-finger rule applies instead. A single finger should slip in with slight resistance. It’s tighter, yes, but the same non-negotiable rules apply: no numbness, no throbbing, no angry red pressure marks when you take it off.
Think of it like a properly fitted bra strap or helmet chin strap (the same “snug but comfortable” logic applies across products). The brace should feel secure enough that it doesn’t slide down your forearm or ride up toward your palm, but relaxed enough that you’d forget it’s there after twenty minutes. That balance, firm positioning without punishing pressure, is what proper wrist brace positioning should feel like.
How to Size and Fasten a Wrist Brace Step-by-Step
Most people fasten a wrist brace the way they’d close a shoe—grab, pull, done. That’s exactly why so many braces end up crooked, bunched, or cutting off circulation by lunchtime. The order you fasten things in matters more than how hard you pull.
Start flat, then build outward:
- Sizing Without Guesswork. Measure wrist circumference with a flexible tape at the narrowest point, just above the styloid bone. Keep your wrist relaxed, don’t pull the tape tight. Many wrist brace manufacturers or brands’ charts split small/medium from large/XL around 6.5 inches, though this shifts by brand. Stuck between sizes? Go bigger. Tight compression on an adjustable wrist splint is easier to fix than a brace that’s already cutting off circulation.
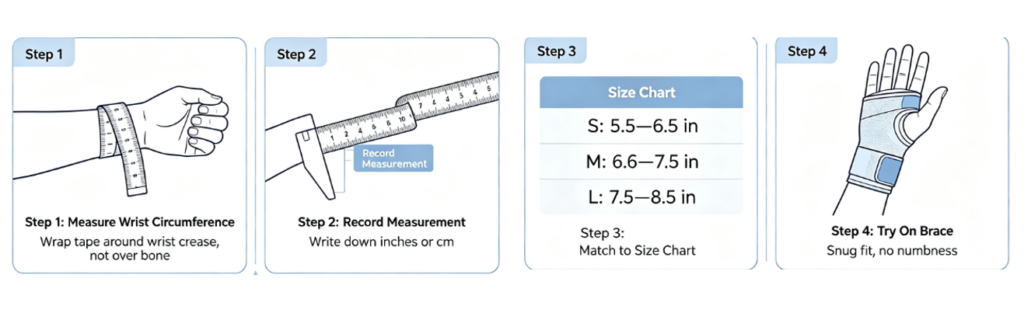
- Open every strap completely and lay the brace flat before you slide your hand in. Trying to wedge your wrist into a half-fastened brace is how you end up with twisted straps and uneven pressure.
- Center your wrist and hand inside the brace. If there’s a thumb cutout or spica opening, tuck your thumb in first so it sits naturally rather than getting dragged into place later.
- Fasten the strap closest to your wrist first, not the one near your knuckles. Working from wrist to forearm distributes tension evenly instead of squeezing one spot.
- If your brace has D‑rings or laces, thread the strap through the ring before pressing it back onto itself. This little detail keeps the compression balanced instead of lopsided.
- Move upward, strap by strap, finishing with the one nearest your hand or forearm. Save any thumb strap for last so it locks the thumb into a stable, neutral position.
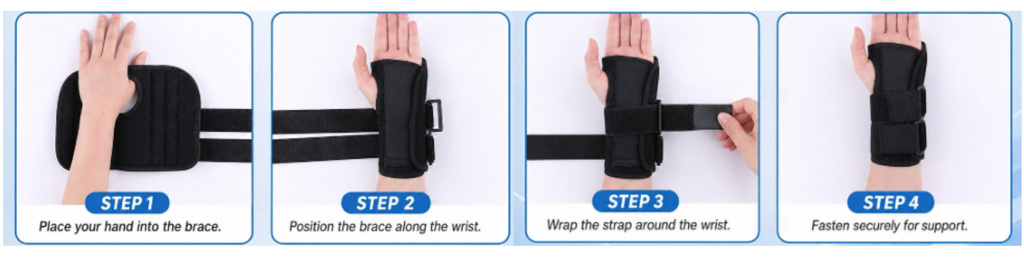
Don’t crank one strap to max tightness in a single pull. That rule matters more than any of these steps. Tighten firmly, pause, then adjust. Tighten incrementally, not all at once.
Before you call it done, wiggle your fingers. You should have full movement with support underneath, not stiffness. Check that the edge of the brace isn’t creeping above your palm crease, and that it lies flat without gapping or twisting.
Warning Signs Your Wrist Brace Is Too Tight
Your body will tell you when something’s wrong. You just need to know which signals to watch for.
The nerve and circulation red flags:
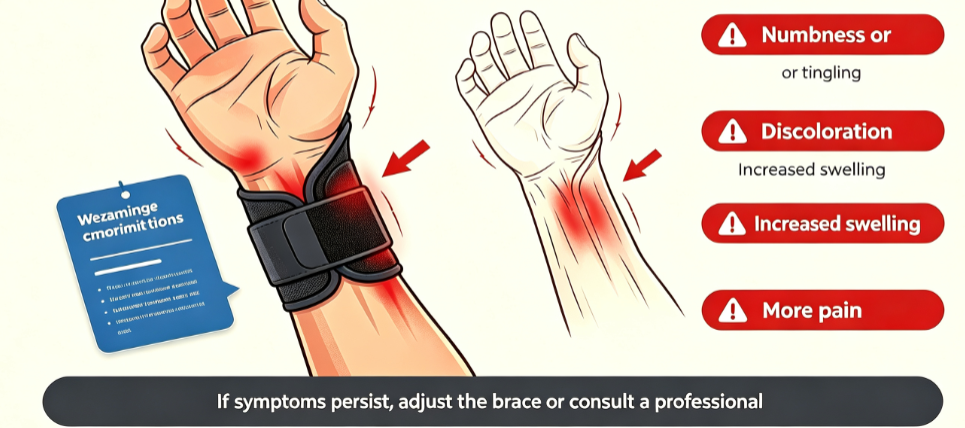
- Numbness, tingling, or a burning “pins and needles” feeling. If this shows up within minutes of putting the brace on, that’s your nerve compression warning bell.
- Fingers that turn white, blue, purple, or unusually red. Any color change means blood flow is being restricted.
- Cold fingertips. Warm hands going cold under a brace is a circulation issue, full stop.
- A pulsing or throbbing sensation under the strap. This is your brace acting like a tourniquet—not what you want.
- Pain that intensifies, especially right at the strap edges.
What you can see:
- Red marks, indentations, or tenderness where the brace edges or bony areas of your wrist sit.
- New swelling appearing above or below the brace (elevating your hand should help; if it doesn’t, pay attention).
- Blisters, localized heat, or persistent friction are early signs of skin breakdown.
If any of this happens, don’t push through it. Loosen the strap immediately, then try the one-finger test. You should be able to slip a finger in without a struggle. Can’t? It’s too tight. Give it 15–20 minutes, then recheck color, temperature, and numbness. Still off? Size up or stop wearing it.
Call your doctor if you have persistent numbness, color changes, real swelling, or fingers that won’t move properly.
Warning Signs Your Wrist Brace Is Too Loose
A brace that’s too loose is sneakier than one that’s too tight. You don’t feel dramatic tingling. You just slowly slide toward “why am I even wearing this thing?”
Watch for these signs:
- It migrates. If your brace creeps up or down your forearm by an inch or more during normal movement (or overnight), it’s not doing its job.
- It twists. A properly positioned brace stays centered over your wrist joint. If it rotates instead, the positioning has already failed.
- You can still bend freely. Try flexing your wrist inside the brace. If it moves 90 degrees up or down without resistance, there’s no real immobilization happening.
- You’re constantly readjusting. If the straps won’t hold, you need to adjust them more often than every few hours.
- The fit gap test fails. Slide your fingers underneath. If 2 to 3 fingers fit easily (the ideal is one-finger snugness), size up or tighten.
- Pain isn’t improving. No relief after consistent wear, especially with a wrist brace for sleeping tightness, means the brace isn’t stabilizing anything.
If tightening the straps doesn’t stop the slipping, the size is probably wrong, not just the fit.
The 15-20 Minute Fit Test (Self-Check Method)
Fifteen to twenty minutes is the real test. That’s how long it takes your body to show whether the fit you thought was perfect holds up once you start moving, typing, or going about your day.
Here’s how to run it.
Step 1: Put the brace on and go about a normal activity. Nothing extreme—just enough movement to mimic real wear. Fifteen to twenty minutes in, stop and check four things:
- Color. Compare both hands. Are your fingers on the braced side pale, bluish, or redder than the other side?
- Temperature. Touch both hands. One colder than the other is a flag.
- Sensation. Any numbness, tingling, or that pins-and-needles feeling that hasn’t gone away?
- Pressure points. Press around the strap edges and bony areas. Any specific spot that’s sore or tender?
Normal means even skin tone, warm fingers, no numbness, and no sore spots. That’s your green light.
Signs that need adjustment include pale or blue fingers, a colder hand, lingering numbness, or a sharp ache under a strap. Any one of these means it’s time to fix things.
Step 2: Micro-adjust. Loosen the strap at the tightest spot. Re-seat the brace so pressure spreads out instead of concentrating in one place.
Step 3: Wait one to two minutes, then recheck the same four markers: color, temperature, numbness, pressure. If everything’s normalized, you’re set. If not, repeat the loosen-and-recheck cycle. Still off after a couple of rounds? The size or model itself may be wrong, not just the adjustment.
Conclusion
Getting wrist brace tightness right comes down to listening to your body. Remember the two-finger rule, and run through a quick 15-20 minute check whenever you strap in. Watch for the telltale signs: tingling or pale fingers mean it’s too tight, while a brace that slides around during daily tasks is too loose. This small habit separates healing well from accidentally making things worse. Whether you’re wearing your brace at your desk, during a workout, or drifting off to sleep, the goal is always support without sacrifice. If something still feels off after tweaking it, don’t wait it out. Call your doctor or physical therapist.
Further, for hospitals, healthcare brands who want to update the product line to solve the problem of your patients’ complaints on sizing, AOFIT, as your reliable orthopedic brace manufacturer, is ready to service you with our full OEM/ODM solutions, including adjustable features, sizing information and wearing guiding.