You just left the pharmacy or your surgeon’s office with a knee brace in hand, a nod of instructions you half-remember, and a knee that’s throbbing enough to make “figure it out later” feel like the worst possible plan. How to put on a knee brace depends on which one you’re holding. A hinged post-surgery brace goes on with nothing like a compression sleeve, and cinching a wraparound ACL brace the wrong way can cut off circulation instead of protecting your joint.
This guide walks through every major brace type—sleeves, wraparounds, hinged, immobilizers, and more—with step-by-step instructions, the fit checks that matter, and the small mistakes that quietly undo all your careful wearing.
Pre-Application Prep
Let’s get you set up right, no guesswork required.
Identify Your Knee Brace Type
Quick visual ID on different types of knee braces:
- Metal or plastic hinges on both sides → hinged/functional brace, built for lateral and rotational stability
- A hole or pad over the kneecap → patellar-stabilizing brace, keeps your kneecap tracking correctly
- 2–4 Velcro straps wrapping around → wraparound brace, common on soft hinged designs
- Just stretchy fabric, no rigid parts → knee sleeve, Cleveland Clinic notes these aren’t braces at all, just compression
- Bulky rigid frame with reinforced sides → unloader brace, used mainly for arthritis to shift pressure off the damaged side
- Longest side bars, most rigid, movement clearly restricted → immobilizer, typically used post-surgery
A sleeve compresses and warms; a brace has hinges, bars, or straps that actually limit motion. Know which one you’re holding before step one.
Skin & Brace Check
Sweat and lotion are the enemy of a good fit. Before you touch a strap, wipe your knee down with a dry towel—every drop of moisture increases sliding and skin irritation once the brace goes on. Skip the lotions, creams, or powders unless your doctor specifically told you to use them; they mess with grip.
Run this checklist on the brace itself:
- Velcro still grips tight, no peeling
- Hinges move smoothly, no wobble or squeak
- Fabric and padding are intact, no tears or flattening
- Straps sit snug, not stretched thin
AOFIT Orthopedic Brace Manufacturer‘s guidance is blunt here: check fit and placement before you’re relying on it mid-workout. A quick knee brace sizing guide check now saves you from a knee brace slipping or pinching brace later.
How To Put On A Knee Brace: Step-by-Step Guide
Grab your brace and take a good look before you touch a single strap. The fastest way to tell what you’re working with is checking for hard support structures versus stretchy fabric.
How to Put On a Knee Sleeve (Compression/Pull-On Brace) With/Without Straps
A knee sleeve is the simplest brace to put on, but simple doesn’t mean foolproof. Get the technique wrong and you’ll end up with bunching, slippage, or a pressure point right behind your knee.
Steps to put it on:
- Sit down and straighten your leg. This is the easiest starting position—way less resistance than trying to pull a sleeve up a bent knee.
- Gather the fabric at the bottom, then roll it up from your foot. Treat it like pulling on a sock, not yanking on a rope. Work it up in sections instead of forcing it into place in one pull.
- Smooth out wrinkles as you go. Pause at your calf, then again at your knee, and press out any bunching before moving higher.
- Center it over your kneecap. If there’s a patellar opening, your kneecap should sit dead-center in that hole. No opening? Line up the sleeve’s midpoint with the center of your patella instead.
- Check behind your knee. Wrinkles or rolled edges in that crease are the most common mistake—and they’re the ones that mess with movement most.
- Wrap the straps from back to the front twice(from bottom to up). Then attach the strap ends to the square fastener.
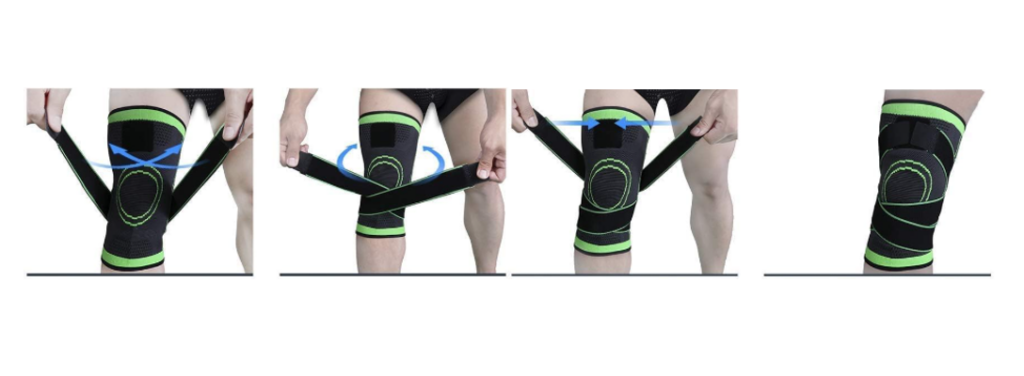
A useful sizing reference: the top edge shouldn’t land right on the bend of your knee. Compression sock guidance suggests leaving roughly two finger-widths of clearance below the crease—apply the same rule here.
How to Put On a Wraparound Knee Brace
Wraparound braces—the soft-hinged style with 2-4 Velcro straps—are the most common pick for a knee brace for ACL injury and other ligament support needs. They’re forgiving if you follow the order of operations, but skip a step and the whole thing shifts mid-stride.
Follow this sequence:
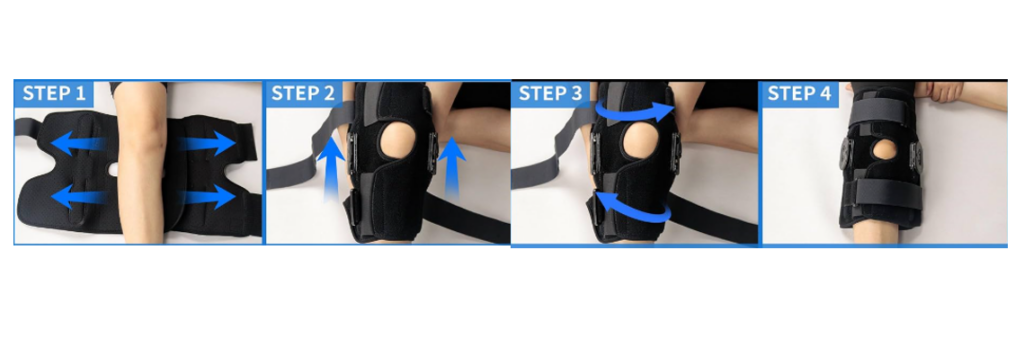
- Open every strap first. Don’t fight tangled Velcro while trying to position the brace.
- Bend your knee slightly, then slide the brace into place from behind. Position the body of the brace behind your knee, then wrap the material forward around the joint. Check for twists or folds before fastening anything. Wrinkled fabric now means pressure points later.
- Line up the center opening with your kneecap first. Your patella should sit centered in that pad or hole. This step matters more than tightness.
- Secure the strap closest to your joint first, lightly. This locks the brace’s position so it can’t slide while you adjust the rest.
- Work outward, tightening top and bottom straps last. Pull each to snug, not stiff.
The fit test: you should be able to slide one finger under any strap. If you can’t, it’s too tight. If the brace slips when you walk, it’s too loose.
Take a few steps, or try three slow squats. Watch for slipping, pinching, or numbness. Re-adjust if anything feels off. Wearing pants underneath adds friction and invites slippage, so skip that if you can.
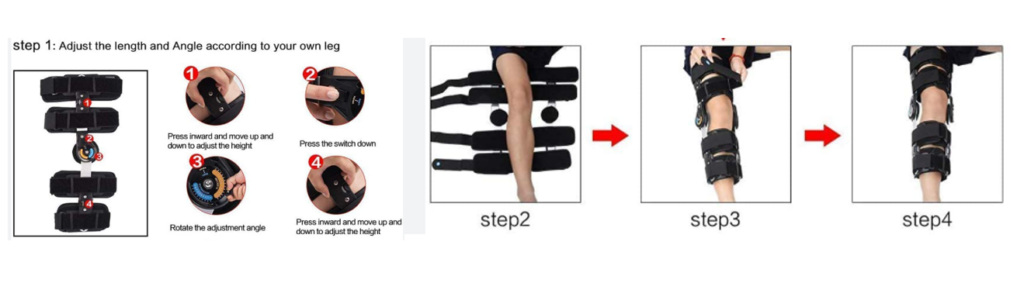
How to Put On a Hinged / Functional Knee Brace
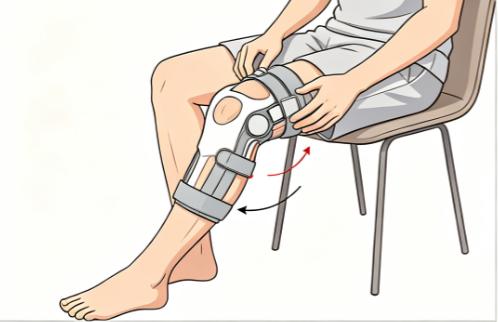
Metal or plastic hinges on both sides are there for rotational stability. That’s also why alignment matters more here than with any other brace type. Get the hinge off-center, and instead of supporting your knee’s natural movement, it fights against it.
Getting positioned:
- Sit down. Straighten your leg, or bend it slightly. Somewhere in the 20–30 degree range works best. This keeps skin folds behind your knee minimal and your kneecap steady, which makes lining up the hinge far easier.
- Open every strap before you start.
- Slide the brace up from your foot. Center your kneecap in the opening or pad.
- Check hinge height. It should sit level with your knee joint, not above or below it. The outer hinge should land near the bony bump on the outside of your knee.
Strap order matters. Work from the bottom up:
- Strap directly below your knee first
- Then the one just above your knee
- Then ankle or calf
- Thigh strap last
Tighten each until snug. You should fit one finger between the skin and strap. Any tighter, and you’re risking circulation problems.
Stand up and recheck. Confirm the hinge stays level with your joint and the brace sits centered without pinching. If it slides down after a few steps, your bottom strap probably isn’t tight enough—that’s almost always the culprit.
If your brace has adjustable range-of-motion settings, lock it to whatever range your doctor specified before you walk away from the chair.
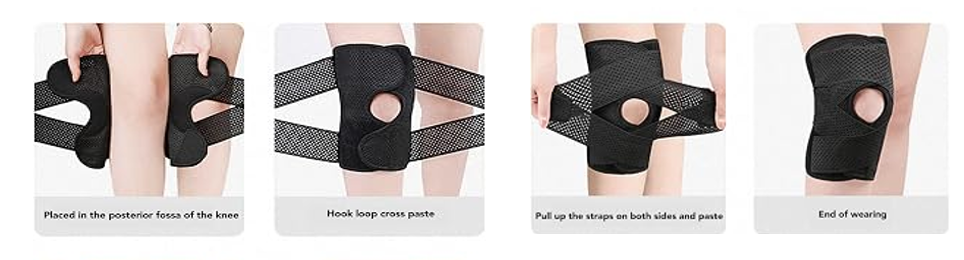
How to Put On a Patellar-Stabilizing Knee Brace
That hole cut into the front of your brace isn’t decorative—it’s the whole point. The job here is keeping your kneecap tracking straight instead of drifting sideways with every step. Centering matters more than tightness ever will.
Getting the position right:
- Bend your knee slightly, somewhere around 20–30 degrees. Some fitting guides call for a seated 90-degree check instead—either works, but pick one and stay consistent.
- Open every strap, then slide the brace up from your foot to knee level on dry skin. Sweat kills the grip fast.
- Center your kneecap in the opening. Run a finger around the edge—you should feel even space all the way around. If one side feels tighter or closer than the other, the brace is off-center. Fix that before touching a single strap.
- Smooth wrinkles bottom to top, then fasten straps working either bottom-up or middle-out, depending on your specific design.
If your brace has a patellar tendon strap, position it 2–3 cm below your kneecap, directly over the tendon. Tighten until it’s firm, not crushing.
Test it: stand, walk, try a few small hops. The brace shouldn’t rotate, slip, or pinch behind your knee. Numbness or pale skin within 10 minutes means loosening it immediately.
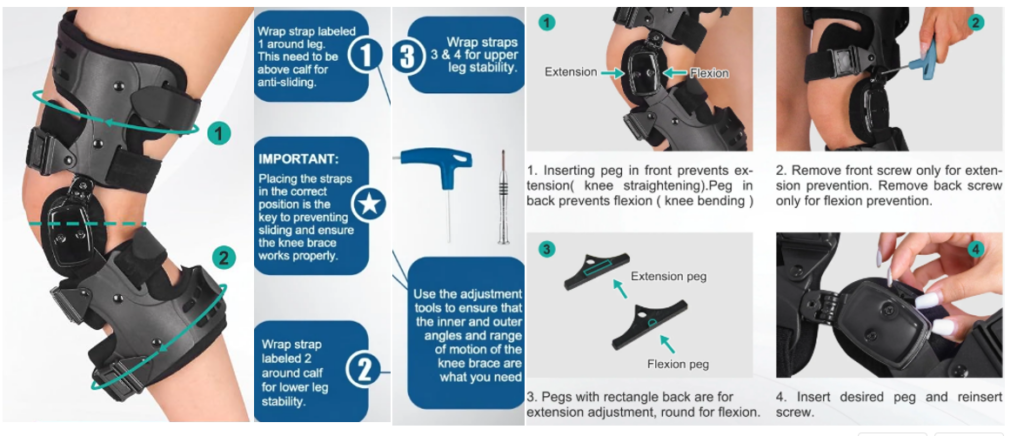
How to Put On an Unloader Knee Brace (for Arthritis Relief)
Arthritis pain doesn’t hit every part of your knee the same way. It’s usually worse on one side. An unloader brace shifts pressure away from the damaged compartment rather than just holding the joint still.
Positioning comes first:
- Loosen every strap.
- Place the brace so the hinge lines up with your joint line and the center of your kneecap. An off-center hinge won’t redirect pressure the way it should.
- Locate the condyle pad, the firmer cushion built into one side, and press it against whichever side hurts, inner or outer knee.
Strap order: bottom before top, every time. Securing the calf strap first anchors the brace so it can’t twist or ride up once you move. Place it above the muscle belly, not at its widest point—too low and it slides. Some models include an anti-migration pad at the back of your calf. Fasten that before moving to the upper straps.
Fit check: snug enough to stay put, never tight enough to restrict blood flow. Numbness, tingling, or cold toes mean loosening it immediately.
Test it standing. Walk a few steps. Pain relief on the affected side, no hinge slipping, no rotation. That means it fits correctly.
If your model has an adjustment dial, start at the middle setting. Turn clockwise for more outer-knee support, counterclockwise for inner-knee relief. Make small turns only, because big adjustments overcorrect fast.
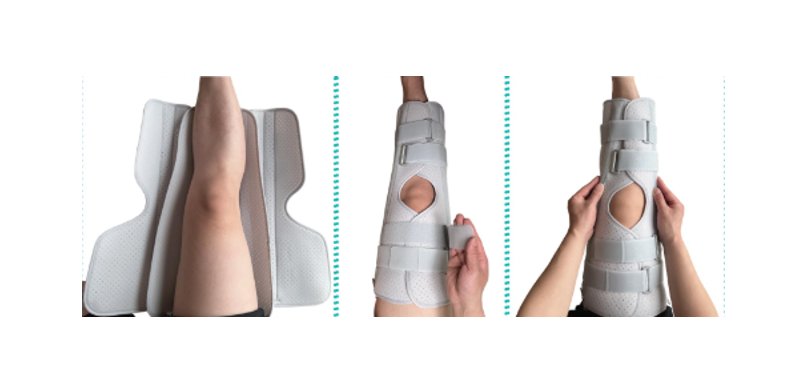
How to Put On a Knee Immobilizer (Post-Surgery / Injury)
This brace does not tolerate a bent knee. Its only job is to keep your leg locked straight, so the setup starts before you even touch a strap.
Get positioned first:
- Lie down or sit with your leg fully straight. The MSD Manual is explicit here: the knee stays extended, supported at the foot, the whole time you’re fitting this thing. MyHealth Alberta backs that up—don’t bend or twist your knee at any point during application.
- Slide the immobilizer behind your leg, centered under the knee. Line the patellar opening up with your kneecap.
- If your model has removable support bars, place them along the inside and outside of your leg. They run the length of your thigh and calf for rigidity.
Strapping order: fasten the strap directly above your knee and the one directly below it first. That locks your leg in extension. Then work outward, leveling the remaining straps.
Fit check: one finger should slide under any strap. MyHealth Alberta’s coverage range is a good gut-check—the immobilizer should run from just below your groin to just above your ankle, without sliding or pinching skin anywhere along that length.
You can wear it over pants or add a compression liner underneath to cut friction.
Before you walk away, confirm:
- Knee is fully straight, no bend
- Brace is centered on your kneecap
- No redness or pinched skin
- Toes have normal sensation and color
Use this only as your doctor directs—wearing time depends on your surgery or injury, and extended continuous use can stiffen surrounding muscle.
How Tight Should a Knee Brace Be? (Fit Check Guide)
Snug is the rule every fit check comes back to. Two fingers should slide under any strap without a fight. If you can’t get one finger in, it’s too tight. If both fingers slip in loose, it’s too loose.
What correct fit feels like: Steady pressure with no pain. No shifting, rotating, or bunching when you move. No rolling or pinching behind your knee.
Warning signs you’ve gone too tight: Numbness, tingling, or pins-and-needles. Skin turning blue, purple, or pale. Swelling that gets worse, not better. Cold toes. Loosen the straps immediately if any of those happen. Don’t tough it out and hope it settles.
Conclusion
Getting this right isn’t complicated once you know your brace type, but the details matter. Whether you’re working with a hinged knee brace, a simple compression sleeve, or a post-surgery immobilizer, you need to check your skin first, align the brace before you tighten anything, and always do a fit check afterward. Two fingers should slide under any strap, no more, no less. A brace that passes this check supports your recovery, and one that doesn’t is uncomfortable or cuts off circulation.
To keep a knee brace easy to wear, AOFIT, as your reliable medical knee brace factory, can control strap designs, structure patterns, and testing. Together, we help brands reduce complaints by giving clear wearing guidance. Reach out to AOFIT now for your custom solution.