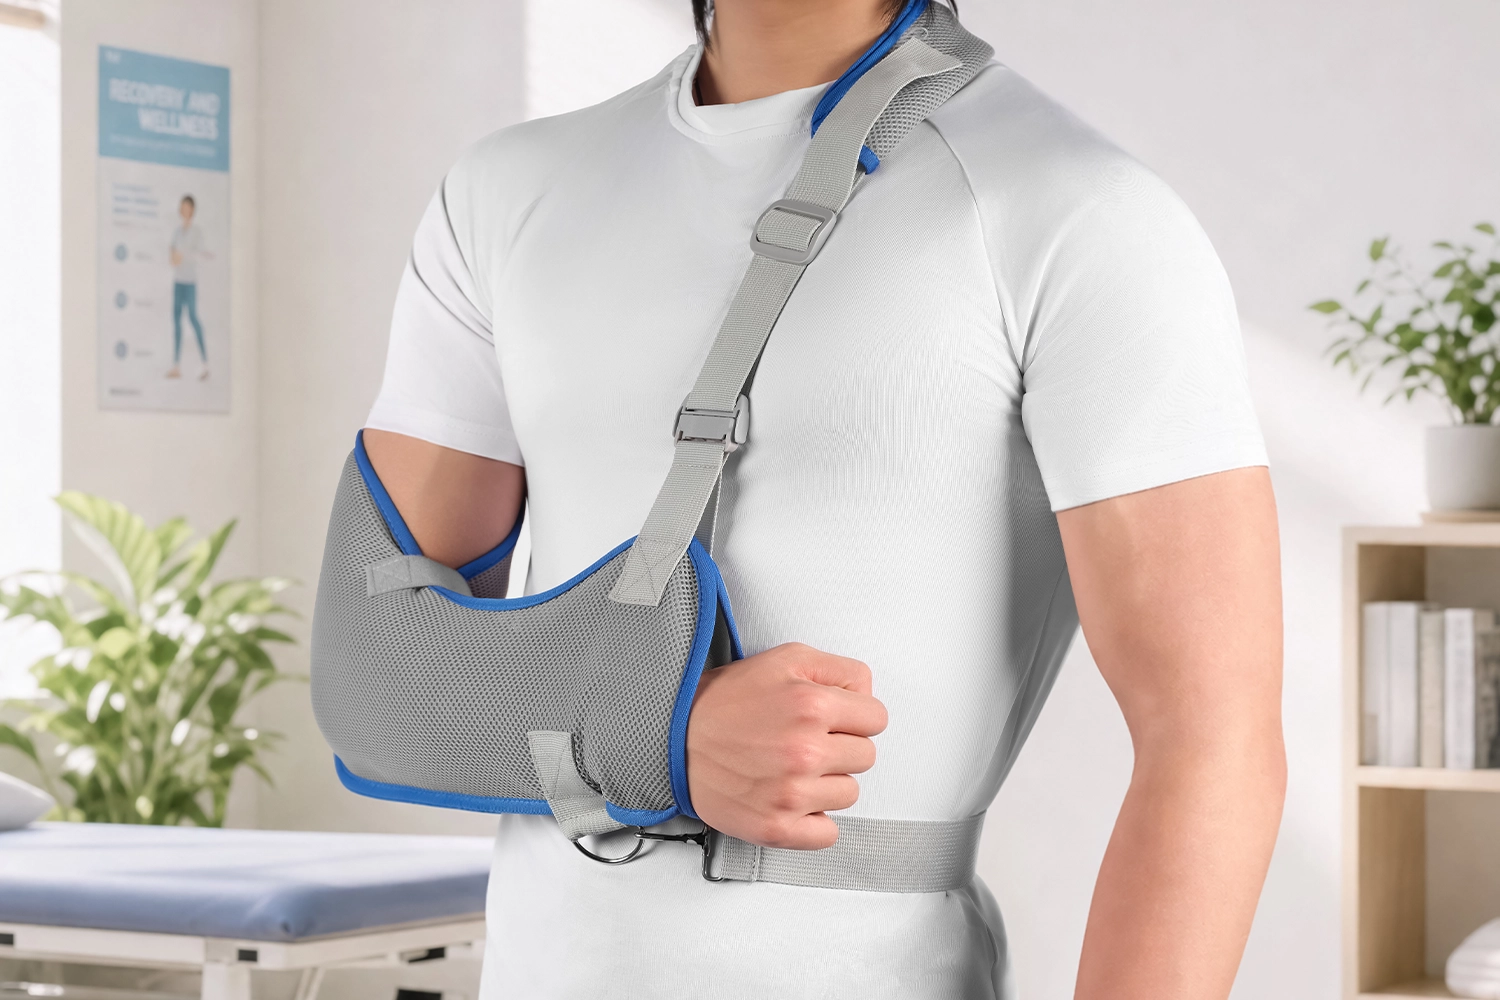
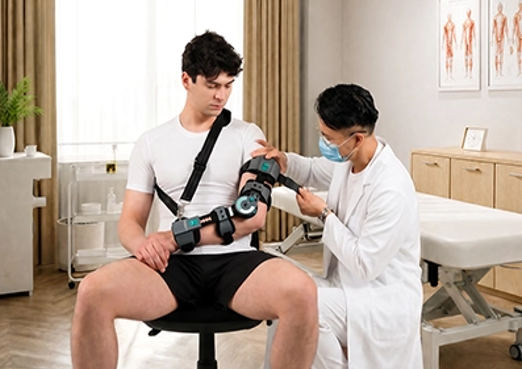
Just had elbow surgery, torn a ligament, or gotten hit with a diagnosis that includes the word “immobilize”? Your doctor probably mentioned a hinged elbow brace and sent you on your way with zero instructions on what that actually means for your daily life. That’s a problem, because this isn’t a one-size-fits-all sling you can just strap on and forget about.
A hinged elbow brace is a precision tool that protects healing tissue, controls how far your arm bends, and can make or break your recovery timeline depending on whether you’re using it correctly. Get the fit wrong, skip the ROM adjustments, or wear it too long (or not long enough), and you’re looking at setbacks instead of progress.
You need to know what it does, who actually needs one, how to put it on without fumbling with the straps, and how to dial in the right angle so your elbow heals the way it’s supposed to.
What Is a Hinged Elbow Brace
A hinged elbow brace is an elbow orthosis with a mechanical hinge that controls how much your arm bends and straightens. It sits between a rigid elbow immobilizer and a basic compression sleeve. The hinge needs to line up with your elbow’s flexion-extension axis, near the lateral epicondyle. Get that wrong, and you lose comfort and stability when you need both.
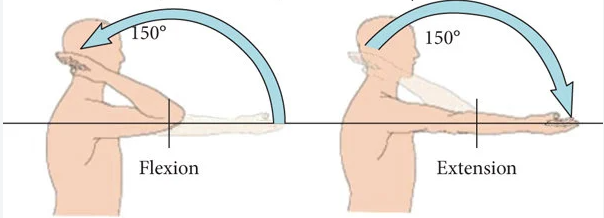
Types of hinged elbow braces
Hyperextension (Athletic) Hinged Elbow Brace provides thermal support for prevention, treatment & rehabilitation purposes of the elbow. Medial and lateral hinges provide a hyper-extension stop at 0°. Crisscrossing “x” hook and loop straps help limit motion at less than 0°. Sometimes, there is an added benefit of heat therapy.
Post-Operative ROM (Range of Motion) Hinged Elbow Braces feature supporting sling, long, adjustable rigid bars (telescope in length, roughly 15.75 to 18.75 inches), lock-out capability and dial-in or pin stops. The upper-arm cuff wraps the humerus above the joint. The forearm cuff secures the proximal forearm below it. Bilateral hinge units define your motion arc and turn it into a true range of motion elbow brace. Hook-and-loop strap closures keep everything from migrating during movement.
Doctors use them to restrict movement to a safe arc (or lock the joint completely) after major tendon, ligament, or fracture surgeries. They can usually be adjusted to limit extension at 10°, 15°, 30° or 45° settings.
Who Needs a Hinged Elbow Brace
UCL reconstruction and repair patients top the list. If you’ve had Tommy John surgery or any ulnar collateral ligament fix, this is your standard timeline. Lock at 90° for the first week, then open up weekly. You go from 30–90° to 15–110°, then 10–120°, then 5–130°, and finally full 0–130° extension. Most protocols pull the brace at 6–8 weeks. The whole point is protecting repaired tissue while blocking valgus stress, the sideways force that wrecks throwing elbows. You’ll wear it sleeping and in public for the first three weeks and avoid any valgus loading for a full three months post-op.
Ligament instability and dislocation cases need it just as much. Mild to moderate medial or lateral instability, hyperextension injuries, collateral ligament repairs—the brace controls the exact movements that re-injure you.
Who Doesn’t Need One
Tennis elbow and golfer’s elbow (lateral and medial epicondylitis) usually skip the hinged brace entirely. Golfer’s elbow responds better to limiting inner-elbow strain and repetitive wrist flexion. Tennis elbow responds better to reducing wrist-extension pain. Both usually call for a counterforce brace with a compression pad instead.
The exception is when tendonitis comes with instability, a recent surgery, or the need to block extension. In those cases, you want hinged support.
If your problem is pain without instability, skip the hinge. If it’s post-op recovery, ligament damage, or uncontrolled extension, you need it.
How To Put On a Post-Operative ROM Hinged Elbow Brace
Most reinjuries from a hinged elbow brace don’t come from the injury itself. They come from putting the thing on wrong. Here’s the sequence that actually works.
Before you touch your arm:
- Unbuckle every strap and open the brace flat.
- Check left versus right. Hinges are side-specific. A mismatched brace won’t sit right on your joint.
- If your doctor gave you a ROM limit, set the hinge’s flexion-extension stops to that angle before you put the brace on.
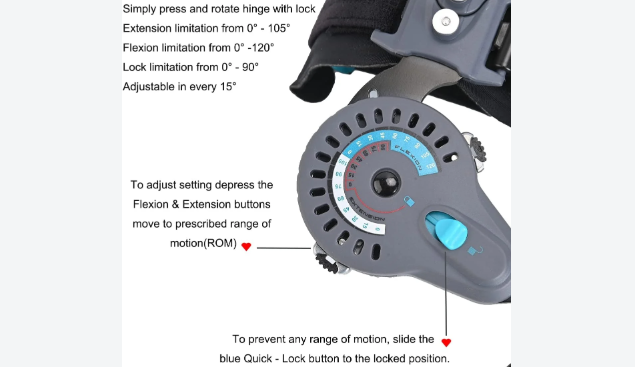
Adjust the Range of Motion (ROM)
Don’t guess at your angle settings. Every hinged elbow brace with adjustable ROM comes locked to whatever your surgeon prescribed, and changing that number without a doctor’s sign-off is how people turn a controlled recovery into a setback.
The hardware you’re working with. Most elbow ROM braces use one of three adjustment mechanisms: hinge stop tabs that slide into numbered slots, a control dial or pull-tab that clicks into fixed degrees, or a combination of both on opposite sides of the hinge. Common lock positions run in 10–15° increments: 0°, 15°, 30°, 60°, 90°, 120°. Your prescription will specify two numbers, an extension limit (how straight you can go) and a flexion limit (how far you can bend). Set the extension limit first, then the flexion limit second. That order matters because extension is usually the more protective restriction post-surgery.
Sync both hinges or the brace fails. This is non-negotiable. Both the medial and lateral hinges need the identical setting. Adjust one side and forget the other, and you get uneven load through the joint, exactly the stress the brace exists to prevent. Manufacturers flag this step as critical for a reason.
Verify before you trust it.
First, confirm the lock tab or dial has fully seated into the target notch, not stuck between two settings. Then do a slow, passive bend and straighten test. If your range is capped at 15–110°, your arm shouldn’t move past either number. Check that both hinges read the same angle side by side. Watch for hinge drift during movement – if it’s sliding off the joint center, re-tighten the straps before you re-check the ROM setting.
The actual steps:
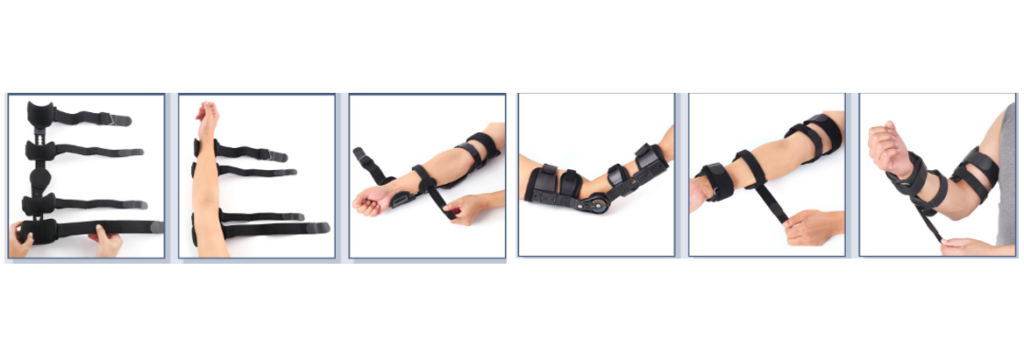
- Slide your arm in. Forearm into the lower shell, upper arm into the upper shell.
- Align the hinge. Center it over your elbow joint, right at the lateral epicondyle or the bony bump behind your elbow. Get this right.
- Square up both cuffs. Smooth out any padding wrinkles before you tighten anything.
- Strap in order, working outward from the joint. Tighten the strap closest to your elbow first, then move to the next one out. Pull the farthest strap first and you’ll drag the hinge off-center every time.
- Recheck hinge position. Bend and straighten your arm. The hinge should stay locked over your elbow’s center, not sliding more than about an inch.
- Fit test. Snug is the target. If you can slide one to two fingers under the straps, that’s it. Numbness, tingling, or color change means loosen it now. Sagging or a hinge that migrates means it’s too loose.
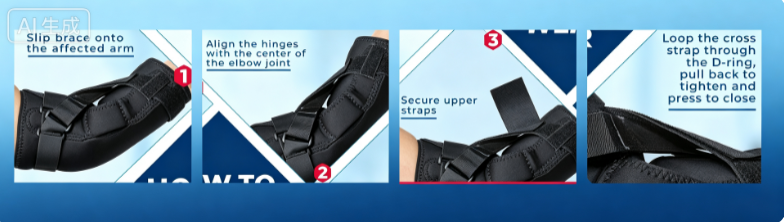
If it is a Hyperextension (Athletic) Hinged Elbow Brace
- Slip brace onto the affected arm
- Align the hinges with the center of the elbow joint
- Secure upper straps
- Loop the cross strap through the D-ring, pull back to tighten and press to close
How To Choose the Right Hinged Elbow Brace
Three brace categories exist, and picking the wrong one wastes money and delays recovery. Match the brace to your actual injury first, then worry about brand or price.
Match the brace to your actual injury
Post-surgical ROM-control braces lock and adjust flexion angles for controlled recovery. Basic hinged stabilizers handle lateral stability for sports or moderate support.
Sizing: Get the Measurement Right
Hinged braces size off mid-bicep circumference, measured relaxed, because the hinge has to align with your elbow’s actual axis. ROM braces often need both upper arm and forearm circumference. Reference these industry ranges:
| Brand | Size | Bicep Circumference |
| Bledsoe | M | 12.25–13.5 in |
| BREG HEX | M | 10.5–12 in |
| Thermoskin | LG | 12–13.75 in |
Stuck between two sizes? Pick the one that doesn’t slip or pinch.
Avoid Ulnar Nerve Compression
The ulnar nerve runs right along your inner elbow. A brace with thin padding or a hinge sitting directly on that bony bump will cause numbness fast. Look for thicker medial padding, rounded edges, and straps that distribute pressure instead of concentrating it in one spot.
Comfort and Breathability
Breathable mesh and perforated foam beat thick padding if you’re wearing this for weeks. Removable, washable liners matter more than they sound like they would.
Price Range
Amazon listings for hinged elbow braces run $20 to over $500, but most functional options land in the $20–$50 range. Medical-grade ROM braces with adjustable locking start around $55+.
Safety Precautions & Warning Signs (Usage Precautions)
Four things can get you hurt with a hinged elbow brace, and none involve the brace failing mechanically. They involve you.
Never touch the ROM setting without your doctor’s sign-off. Every manufacturer spec sheet says the same thing: ROM adjustments happen under medical supervision, period. Change it yourself and you risk circulation damage, spiked pain, or reinjury.
Never push through pain, swelling, or weird sensations. You’re ignoring your body’s alarm system. Stop, loosen the brace, call your provider.
Never crank the straps too tight. Snug means snug, not restrictive. Overtightening cuts circulation. You’ll know it by numbness, purple or blue skin, or cold fingers.
Never wear it over an open wound. These braces sit against skin for hours. Broken skin plus that setup means infection risk you don’t want.
Warning Signs That Mean Stop Now
- Numbness, tingling, pins and needles – loosen immediately; if it doesn’t clear, remove the brace and call your doctor
- Blue, purple, or unusually cold skin – check strap tension and hinge position right away
- Increased redness, swelling, or heat – could signal excess pressure or a developing clot
- Burning pain, blistering, discharge, or odor – possible pressure sore or infection; get seen fast
If Something’s Wrong, Do This
- Stop moving the arm. No weight, no twisting.
- Loosen the straps and reposition the brace.
- Check circulation — skin color, warmth, whether numbness fades.
- No improvement in a short window? Remove the brace and contact your doctor. Chest pain, trouble breathing, or one leg swelling and turning red or hot means you need to go to the ER.
When the Hinge Slips Out of Place
A misaligned hinge changes how force travels through your joint. Stability drops. Friction and pressure sores become more likely. And a poorly aligned brace can raise your reinjury risk instead of lowering it.
Catch it early:
- Check your skin daily. Red marks, broken skin, or lasting redness mean the brace needs repositioning.
- Watch the hinge during walking or movement. Catching, rubbing, or localized pain usually means it’s drifted off your joint axis.
- Test the fit. Too loose kills support. Too tight kills circulation. The sweet spot is stable support with zero numbness, color change, or cold sensation.
- Time your red marks. If a mark from the strap lasts longer than 15 minutes after removal, that’s too much pressure. Adjust before you put it back on.
- Give it an hour. Elevate, adjust, wait. If color, temperature, or sensation hasn’t normalized within an hour, see your doctor. Don’t wait for the next scheduled visit.
Frequently Asked Questions
How long do I wear a hinged elbow brace?
Anywhere from 2 to 12 weeks. Post-surgical protocols and ligament repairs run longer, often 6 to 8 weeks minimum, sometimes stretching to 12. Simple, stable injuries without ROM restrictions can wrap up in 2 to 3 weeks. Your surgeon’s specific ROM limits determine your number.
Do arthritis and post-surgical injuries get the same wear schedule?
No. Arthritis calls for activity-based wear. You put the elbow orthosis on during movement or load-bearing tasks, not all day. Post-surgical elbow ligament brace protocols are stricter. You wear it full-day, sometimes sleep in an elbow brace, and it locks at specific angles that open incrementally over weeks.
Can I change my ROM setting myself if I feel ready?
Don’t. This applies to any range of motion elbow brace with a locked flexion-extension limit. Adjusting early, even by a few degrees, risks reinjuring healing ligament tissue. Wait for your provider’s sign-off, every single time.
How to clean the hinged elbow brace?
Cleaning schedule: wipe down after every sweaty wear. Hand-wash straps and padding every 1–3 days for daily use, weekly for hinge components. Use cold water and mild, fragrance-free soap. Never use bleach or fabric softener—they degrade elastic and hook-and-loop closures.
Drying: air-dry flat, away from heat, radiators, or direct sun. Never toss it in a dryer.
Hinge upkeep: clear debris from the joint, apply dry silicone lubricant occasionally, and check that the screws stay snug.
Conclusion
Recovery is about getting the details right. A hinged elbow brace works only as well as you use it. The right fit, the correct ROM setting for your healing stage, and consistent wear protect your joint while it rebuilds strength. Skip any of those steps, and even the best elbow orthosis on the market won’t do its job.
Understanding your injury, choosing a brace that matches it, and following your adjustment schedule make the difference between a smooth recovery and a setback that costs you weeks.
AOFIT, as your reliable medical brace manufacturer, offers you custom elbow braces with wide hinge options. If you’re a hospital looking for solutions for controlled recovery, prioritize Post-surgical ROM-control braces. If you’re a sports brand, basic hinged stabilizers matter more than buzzwords.