

You leave urgent care with a cervical collar in a plastic bag and zero instructions. A soft neck brace for a minor whiplash injury or a rigid cervical collar prescribed after surgery—getting the fit wrong isn’t just uncomfortable. It can slow your recovery or make things worse. If you’re helping a parent or partner into their brace each morning, the stakes and the confusion grow.
This guide covers how to wear a neck brace, collar by collar, from the Philadelphia and Miami J to Aspen-style designs, so you’re not guessing at straps and buckles. You’ll also learn how to check for proper fit, and spot the warning signs that mean not fitting.
How to Wear a Neck Brace: It depends
Soft or rigid, one piece or two pieces, these collars look similar from across the room, but they’re built differently, and that changes how you put them on.
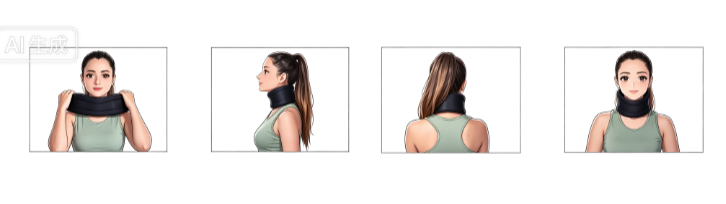
Soft Cervical Collar: Step-by-Step Wearing Guide
A soft neck brace supports mild strains, sprains, or that early recovery window after acute pain when you need to move less, not stop moving entirely. Usually, you can put it on yourself.
Before wearing
Finding Neutral Position: If you’re lying down, stabilize your head and neck before you touch the brace. If you’re sitting up, keep your head straight and facing forward. Your nose lines up with your belly button, chin level—no tilting forward, back, or to either side. When sitting, your eyes are level with the horizon. When lying down, your nose points at the ceiling.
Step by Step guide
Step 1: Open both sides of the brace outward. Place the top/centre of the collar directly under the chin.
Step 2: The chin should not slip into the collar. Hold it firmly with both hands and push one side of the panel towards the neck.
Step 3: Fasten the hook and loop on the left to the neck support on the right.
Step 4: You can adjust the hook and loop to the best position according to the comfortable tightness of the neck.
Rigid/Hard Cervical Collar: Correct Fitting Method
Rigid cervical collars, no matter if it is a Philadelphia collar, Miami J collar, or Aspen rigid model, are meant to stop your neck from moving. They work differently with two pieces, not one. Sometimes, it needs help.
Before wearing
- Measure the patient. Align the head to neutral or ‘eyes forward’ position unless contraindicated by your protocol. Neutral position Shoulder to chin
- Match the collar size to the patient. Select: Choose from four adult positions; Pedi select: Choose from children positions. Note: Same basic method of adjustment for both collars.
- Adjust the chin support to the size selected in step 2.
- Lock both sides by pressing the two lock tabs.
- Preform the collar.
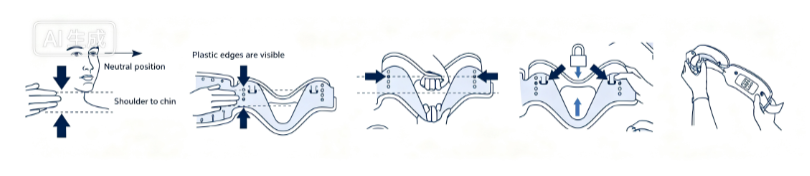
Step by Step guide
The collar above means one solid piece, foam and plastic wrapping the neck front to back. The design is simple, but one NHS policy requires removing it every 4 hours for skin inspection and moisture checks. Pressure injuries happen fast under rigid foam. Build that removal schedule into your routine, not just when you remember.
- Place the chin support well under the chin. If a different size is needed, remove, re-size and re-apply the collar. For a supine patient, slide the rear panel behind the neck before placing the chin support.
- Pull the back of the collar snug while holding the front in place, then fasten.
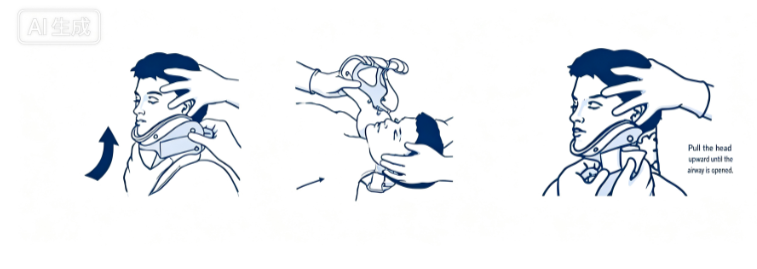
Two-piece collar Sequence
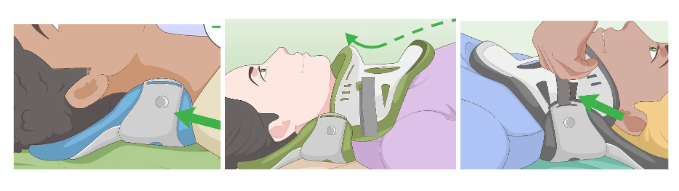
The two-piece collar works differently. It’s two pieces, not one.
Step 1: Slide the back piece in first. Lay the wearer flat with the neck in a neutral position, then guide the back panel in from the side or behind the head. The top edge should land between the earlobe and the top of the shoulder, not on it.
Step 2: Position the front panel under the chin. The chin rests on top of the front panel’s chin support and should never sink into the padding itself.
Step 3: Fasten one side strap. Hold the front piece steady with one hand and clip the back strap to its matching front panel spot. Both sides should look level.
Step 4: Secure the second strap and tighten. Adjust each side until the fit is snug but not compressing.
The front and back plastic sections don’t need to overlap. They just need to meet, with firm contact and centered alignment so nothing slides. Have someone hold your head steady during setup if you can.
How to Check If Your Neck Brace Fits
Forget the strict “two-finger rule” you’d use for a rigid collar. Soft collars are about comfort first. You should be able to swallow and breathe without hesitation. If it feels stable but not squeezing, you’re in the right zone.
Too loose means the collar slides, wobbles, or stops supporting your jaw at all. Fix it by re-centering the chin, pulling both sides back snugger, re-sticking the Velcro, and adjusting the chin strap again.
Check yourself in a mirror: chin centered, top edge cradling your jawline, both sides symmetrical. If skin rubs raw, slip a thin cotton pad underneath. Don’t just pile on padding to fake a tighter fit.
Rigid cervical collars don’t forgive sloppy fitting the way soft ones do. A Philadelphia collar, Miami J collar, or Aspen rigid model exists for one job: stop your neck from moving. The checkpoints here are stricter, and skipping them isn’t a comfort issue—it’s a stability issue.
The 5-Point Fit Check
- Centering: Head lines up straight with your torso—no tilt, no rotation.
- Chin support: Chin rests on the chin cup, flush with the front edge. It shouldn’t sink in.
- Skin contact: The collar hugs the neck with no visible gaps. Full contact, all the way around.
- Strap tension: Both sides end at the same point, snug with no slack. Back and front panels overlap correctly.
- Velcro closure: Fastened to the marked line. Rigid collars need at least 2 cm of panel overlap.
Too Tight
Watch for red marks or indentation at the chin, jaw, collarbone, ears, or shoulders. Numbness, tingling, trouble breathing or swallowing, or redness that doesn’t fade within 30 minutes after removal—all mean loosen it now.
Too Loose
The collar rides up, slides, or wobbles when you move. Chin drops into the cup instead of resting on it. Straps show gaps. If your head can still nod or turn freely, it’s not doing its job.
FAQ: Neck Brace Wearing Questions Answered
Can I drive while wearing my neck brace?
Some post-op instructions explicitly say no when it comes to driving with a neck brace on. A collar limiting your head rotation means you can’t check blind spots safely. Ask your surgeon directly—don’t assume.
How much does a rigid collar actually limit movement?
One study found soft collars cut neck movement by 17.4%, while rigid cervical braces cut it by 62.9%. That gap explains why swapping a soft collar for a rigid one without medical sign-off is a bad idea.
How often should I clean my neck brace?
Daily. Soft collars: sink wash with warm water and gentle soap, then lay flat to dry. Rigid collars: wipe the plastic panels, hand-wash removable pads with soap and water, rinse thoroughly, and air-dry 6–8 hours. Skip bleach and skip the washer/dryer unless your neck brace manufacturer says otherwise.
How Long Should You Wear a Neck Brace
Duration depends entirely on why you’re wearing one. Whiplash and acute cervical strain typically call for a soft neck brace for just 48–72 hours, then active mobilization takes over. Most guidance caps total use at 7–10 days, since collars worn past 72 hours often slow recovery compared to gentle movement.
Mild soft-tissue injuries run 1–2 weeks, tapering after day 3–5. Fractures and dislocations need a rigid cervical collar for 6–12 weeks, often 24/7 early on. Post-surgery protocols vary widely, from 2–6 weeks for some fusions to 12 weeks for others, confirmed by imaging.
Never shorten or extend the timeline yourself. Early removal risks destabilizing an unhealed fracture or fusion site.
Conclusion
Whether you’re working with a soft cervical collar or a rigid Philadelphia collar, proper fit is what stands between you and a smooth recovery or a setback. Get the positioning right, check for that two-finger gap, watch for skin irritation, and don’t skip the follow-up appointments where your doctor confirms things are healing on track.
Once you know your specific type and stick to the routine, wearing a neck brace is straightforward. If anything feels off—persistent pain, numbness, or a collar that just won’t sit right no matter how you adjust it—that’s your cue to call your doctor instead of troubleshooting alone.
Looking for a Cervical Collar Manufacturer to customize your branding with clear product instructions? Contact AOFIT now, and we are ready with wide OEM/ODM solutions, including rigid cervical collars built for post-surgical stabilization, and soft foam collars won’t cut strict immobilization.