
You just unboxed your new wrist brace, and now you’re staring at a tangle of straps, a metal bar, and a loop that may or may not be for your thumb. How To Wear a Wrist Brace With Thumb? Whether your doctor prescribed a thumb spica splint for De Quervain’s, a basic wrist support for carpal tunnel, or something in between, getting the fit wrong isn’t just annoying — it can slow your recovery or cut off circulation entirely.
Once you know how to wear a wrist brace with thumb support (or without one), it takes about 30 seconds to get right every time. Below, we’ll break down each brace style, walk through the exact steps for positioning the thumb loop, and show you how to check the fit so it’s snug, not strangling.
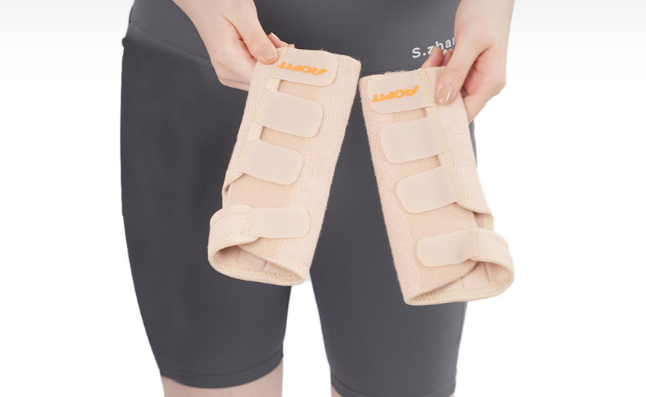
Types of Wrist Braces: With Thumb Support, Thumb Loop, or Hole
With thumb support (thumb spica): This design runs from your wrist to the base of your thumb. It locks the CMC and MCP joints and holds your thumb in a slightly outward position. Your fingers stay free to move. It’s the classic thumb spica splint, used for De Quervain’s tenosynovitis and thumb arthritis (rhizarthrosis), because it limits the motions that irritate the APL and EPB tendons.
Thumb loop design: Lighter than a full spica, this one wraps a loop around your thumb and connects to the wrist strap. There’s no rigid thumb piece — just light positioning support. It’s common in everyday and athletic braces where quick on-off matters more than full immobilization.
Thumbhole Braces: This version only covers the wrist joint. Your thumb stays completely free. It’s the standard wrist brace for carpal tunnel syndrome, wrist sprains, and general wrist strain, where the goal is a neutral wrist position without thumb restriction.
Wrist bandage(Without thumb support): a supportive strip of soft material or elastic fabric wrapped around the wrist joint. It provides compression, reduces swelling, limits painful movement, and stabilizes the area after a sprain, strain, or minor injury.
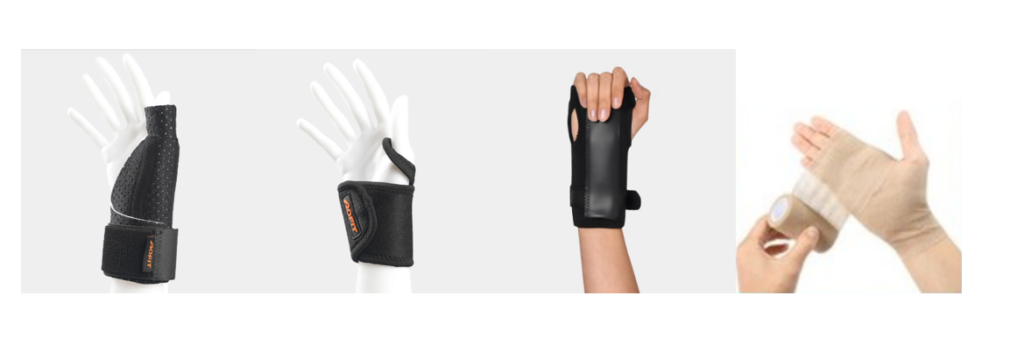
How To Wear Wrist Brace: Different Types, Different Ways
Not all wrist braces are built the same. Pick the right type and put it on properly.
How to Wear a Wrist Brace With Thumb Support
Step 1: Open everything first. Undo every strap — wrist, palm, and thumb — before you try to put the brace on. A half-open brace catches on your hand and throws off the whole fit.
Step 2: Slide your hand in. Palm goes into the brace body, thumb passes through the thumb hole. Don’t force it. If it’s not sliding easily, the brace might be flipped for the wrong hand.
Step 3: Find the metal stay. This rigid bar belongs on the palm side (volar side) of your wrist and forearm. It keeps your wrist neutral — not bent up, not bent down. This is the single most-missed step, and it’s why so many people feel like their brace “isn’t working.”
Step 4: Position the thumb. It should sit naturally, slightly extended, inside the dedicated support piece. The base of your thumb gets stabilized. Your fingertip stays free to move.
Step 5: Fasten in order — wrist, then palm, then thumb. Work from your wrist toward your forearm, finishing with the thumb strap last.
Step 6: Tighten to snug, not tight. One finger should slide comfortably under each strap. If you can’t fit a finger under there, it’s too tight. If it slides right off your wrist, it’s too loose.
Step 7: Do the final check. No pinching, no tingling, no numbness. The wrist stays straight. Fingers move freely.
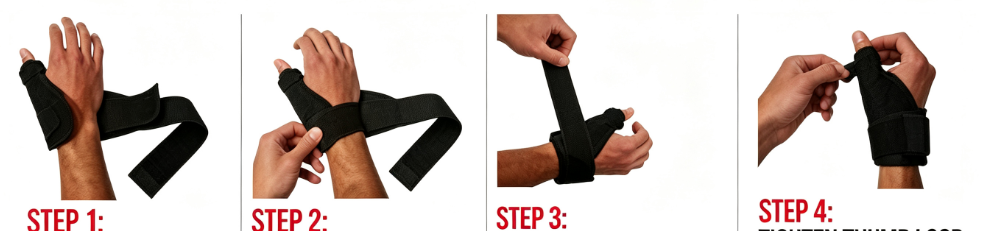
How to Wear Wrist Wraps with Thumb Loop
The correct sequence:
- Thumb through the loop. This happens before you touch the wrist strap. The loop should land at your thumb’s web space (that soft area between thumb and index finger), not choke the tip.
- Position high: Place the start of the wrap high up across the base of your palm and the back of your hand, not just low on your forearm.
- Pull, wrap and move down: Pull the material tight. Do your first pass around the base of your hand to block your wrist from bending back. Angle the next pass slightly down toward your wrist joint to cover the joint fully.
- Secure Velcro: Press the Velcro down firmly to lock the wrap in place.
If there’s leftover strap length flapping around after you fasten it, trim it. Most thumb loop designs expect this.
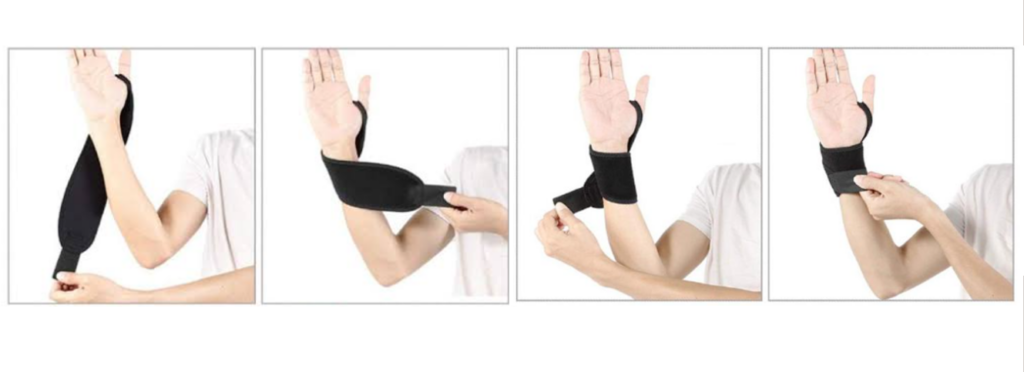
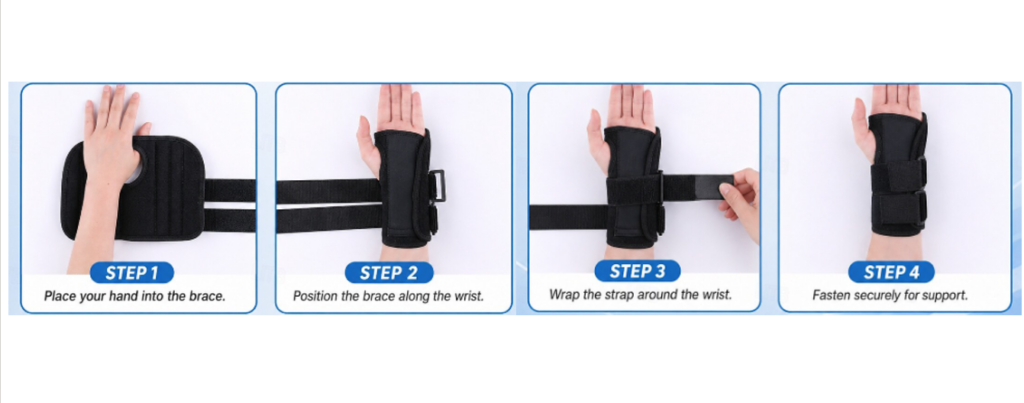
How to Wear a Thumbhole Brace/ Wrist Brace for Carpal Tunnel
Lay it flat, palm-side down. Center your wrist directly over the support stay so your joint sits neutral — not bent up, not bent down. Your fingers and thumb stay completely free the whole time.
Align before you tighten. Make sure the brace edge covers your wrist joint without pressing into your palm. Then work the straps from the inner side outward, starting closest to your hand and finishing near your forearm.
Tightness check: you want secure but not squeezing. One finger should slip under each strap easily. Numbness, tingling, or fingers turning white or purple means it’s too tight — loosen immediately.
After fastening, make a fist, open your hand, and flex your wrist slightly. The brace shouldn’t slide, and your finger joints should move freely. If you’re wearing it for hours — day or night — recheck strap tension after 10-15 minutes. Swelling changes the fit fast.
When This Style Makes Sense
This design stabilizes the wrist only, leaving your thumb fully mobile for typing, writing, or light lifting. It’s the right pick for mild sprains, general wrist discomfort, or keeping a neutral position overnight.
Quick decision rule: if moving your thumb doesn’t hurt, a wrist support without thumb coverage is usually your best fit. If thumb movement triggers pain, you likely need a thumb spica splint instead.
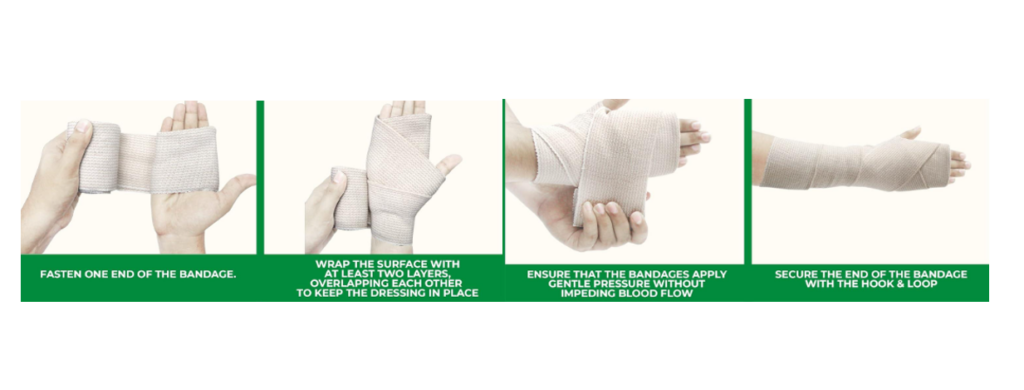
how to wrap wrist with wrist bandage (take ace bandage as an example)
No thumb loop, no rigid thumb piece, no question about where your thumb goes. If your brace only wraps the wrist, this is the easiest style to fit.
- Position the hand: Hold your wrist straight in a neutral, flat position. Face the roll of the bandage upward.
- Start at the palm: Place the start of the bandage on your palm just below your knuckles. Wrap around the palm once to anchor it.
- Loop the thumb: Guide the bandage diagonally across the hand and pass it through the space between your thumb and index finger.
- Create a figure-eight: Bring the bandage around the back of your wrist, cross it diagonally across your palm, and wrap it around the wrist joint moving up the forearm.
- Overlap layers: Overlap each previous layer by about 50 percent as you move up the arm. End the wrap a few inches above the wrist joint on the forearm.
- Secure the end: Fasten the end using the metal clips or Velcro provided with your bandage.
Safety Checks
- Wiggle your fingers: Make sure you can move your fingers easily.
- Check circulation: Ensure your fingers do not feel cold, numb, or tingly, and that skin color remains normal. If it feels too tight, unwrap it and start over with less tension
Common Mistakes When Wearing a Wrist Brace With Thumb Support
Most fit problems trace back to four repeat offenders.
Keep the same fit daily. Your swelling changes, so your strap tension should too. Check the fit daily. As pain and swelling drop, retighten to restore support. If you notice numbness, tingling, or fingers turning white or cold, loosen one notch immediately.
Missing the thumb hole entirely. Left/right mix-ups are common. Your thumb should sit relaxed and slightly bent, like holding a cup, not jammed straight or locked flat.
Skipping neutral wrist position. If your wrist bends up, down, or sideways instead of staying aligned with your forearm, the brace is reinforcing bad positioning instead of correcting it. A visibly crooked brace means something’s off.
Misaligned support bar. The palmar stay needs full contact with your palm with no gaps. If you spot one, bend the stay slightly rather than ignoring it.
Without Cleaning and Maintenance: Supports, braces and orthotics that are worn directly on the skin exposed to sweat and skin particles daily. Regular cleaning, such as when you wash your wrist brace, is not only hygienic, but also helps maintain the lifespan and functionality of the aid.
FAQ: Wrist Brace With Thumb Support, Loop, and Hole
These are the practical questions that come up after the brace is on your wrist.
How Tight Should a Wrist Brace Be?
Snug is the gold standard. Enough resistance to limit wrist motion, loose enough that blood keeps moving and fingers keep working.
How Long Should You Wear a Wrist Brace (Daytime, Night, Activity)
| Condition | Daily Duration | Total Duration |
| Acute sprain or strain (fresh injury) | • 24/7 initially (first 2–3 days, until swelling/pain subside) | • Mild–moderate: 1–2 weeks total• Severe: up to 6 weeks |
| Rehab protocol (gradual approach) | •Start at 15 min × 2/day → build to 30 min → up to ~1 hour/day | •Varies by progress |
| Tendonitis / repetitive strain (daytime use) | • General: 2–6 hours as needed• Baseline support: 2–4 hours• Mild pain: 1–3 hours | •As needed; not all-day: Only during symptom-triggering activities (e.g., typing, lifting, twisting, tool use) |
| Carpal tunnel syndrome (nighttime While sleeping) | •6–8 hours per night | • Typically 4–6 weeks• Some guidance: at least 8 weeks, every night |
| Post-fracture or post-surgery | •24 hours per day | •Until cleared by a doctor |
Are wrist braces left- or right-hand specific?
Usually, yes. Most thumb spica and thumb support models are sold as distinct left-hand or right-hand versions. Check the label before you order. A mismatched brace won’t seat the thumb correctly no matter how you adjust it.
Will a thumb brace help with texting?
Yes, as conservative support. It limits repetitive thumb extension and gripping motions so the irritated tendon gets a break. If pain persists or worsens, follow your doctor’s specific bracing plan instead of guessing.
Conclusion
Whether you’re managing De Quervain’s tenosynovitis or recovering from a wrist sprain, wearing the brace properly is what separates a device that speeds healing from one that sits uncomfortably in a drawer. Match the brace type to your injury, position the thumb the right way (spica splint, loop, hole or none).
Further, for hospitals, healthcare centers or brands who want to update your product line, AOFIT, your reliable Orthopedic Brace Manufacturer, is here to help you with various designs and clear wearing information. Explore our OEM/ODM wrist brace line now.