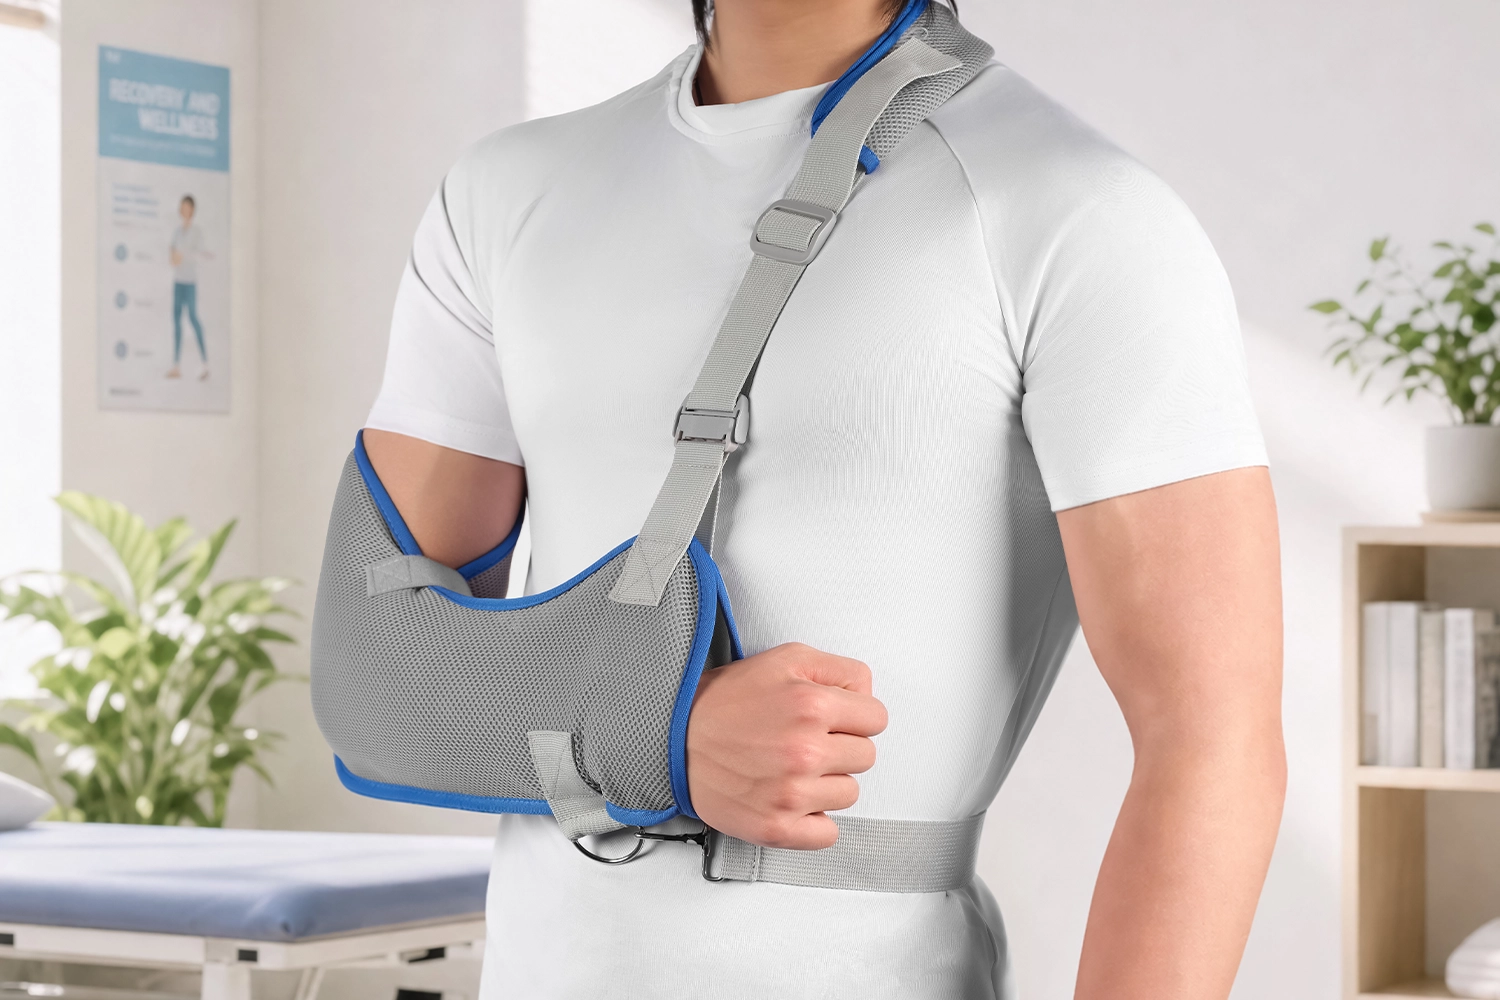
A sudden shoulder injury, or the minutes right after a cast comes off, leaves you staring at straps and fabric, worried you’ll make things worse. That hesitation is normal, but getting the sling right matters because your shoulder is healing. Putting on an arm sling correctly means protecting that healing tissue, reducing pain, and giving your arm the support it needs to recover. Whether you have a ready-made sling from the pharmacy or just a triangular bandage and some quick thinking, we’ll walk through How To Put An Arm Sling On, including the exact positioning and adjustments that make a sling helpful instead of a problem.
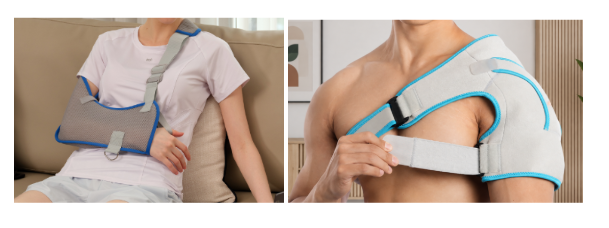
Before You Start: Preparing for Arm Sling Application
Not every arm injury calls for the same fix, and figuring that out first saves you from bigger problems later.
Know When to Call a Doctor First
If you suspect a fracture or dislocation, notice visible deformity, feel intense pain, or can’t move the arm at all, stop. Injuries to the shoulder, collarbone, or upper arm almost always need medical evaluation before any sling goes on. A standard arm sling works fine for wrist, hand, or forearm injuries below the elbow. Shoulder dislocations and rotator cuff tears need shoulder-restricting slings that limit the whole arm’s swing, not just support the forearm.
Match the Sling to the Injury: Shoulder Immobilizer Vs Sling
- Hand, wrist, or forearm damage → standard arm sling or triangular bandage sling
- Elbow-area fractures → triangular bandage, forearm slightly elevated
- Shoulder injury sling application → collar-and-cuff or shoulder-immobilizing design
Get a Second Pair of Hands
For fractures, dislocations, or anything post-surgical, ask someone to help hold the arm steady while you position the sling. Less unnecessary movement means less pain and less risk of shifting a healing bone out of place.
How to Put an Arm Sling on: Different Types, Different Steps
Ready-made slings look intimidating with all their straps and buckles, but the process breaks down into manageable steps. Sit down first and prop the injured arm on a pillow or table edge. That small setup makes the whole fitting process easier and less painful.
How to wear a simple arm sling?
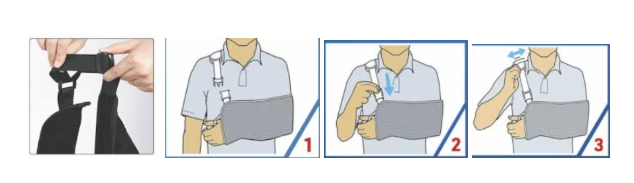
1. Adjust the buckle near the elbow to a length that roughly matches your figure.
2. Unfasten shoulder strap. Insert arm into pouch. Place the elbow snugly into the corner.
4. Bring a strap across your back and over the opposite shoulder. Secure strap in buckle closure. The arm should rest horizontally.
4. Insert thumb in loop. Position pad over shoulder for comfort. To remove, simply slip the strap over your head. No need to unbuckle.
How to Wear a Cross-Back Shoulder Immobilization with a Chest Strap?
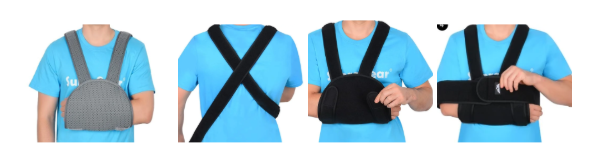
- Put the shoulder strap on your shoulder & put the injured hand in the arm sling
- Cross the shoulder strap on the back
- Adjust the shoulder strap and stick the straps
- Stick the chest strap to the arm sling
How to Wear a Shoulder Immobilization Vest?
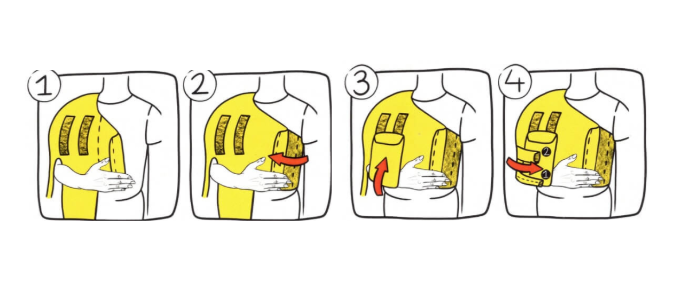
1. Put the arm protector on your left or right arm.
2. Fasten the lower shoulder strap of the vest (below the armpit on the opposite side) at chest height.
3. Fasten the widest lower shoulder strap so that the elbow is at a 90° angle.
4. Fasten the shoulder straps on the forearm and above the elbow.
How to Wear an Adjustable Arm Sling with a Shoulder Abduction Pillow?
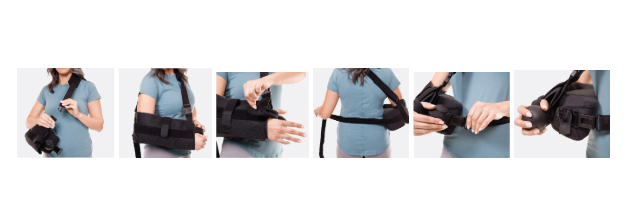
- Wrap padded strap over opposite shoulder, secure with buckle.
- Place the injured arm in the pouch as far back as possible.
- Secure arm in pouch with fastener straps around forearm and thumb.
- Position pillow at waistline between arm and body.
- Wrap a waist strap around the back of your body and secure it.
- Squeeze therapy ball to increase blood flow for faster recovery.
How to Wear a Shoulder Wrap?
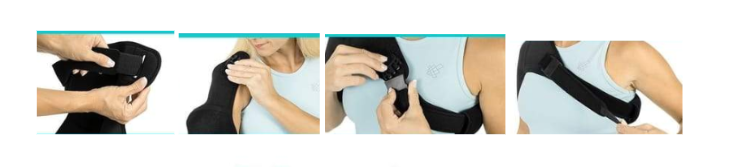
- Adjust the straps to their maximum size
- Slip your arm through the brace up to your shoulder & bring the strap over your head and other arm
- Wrap the strap around the chest and buckle it
- Adjust the chest strap for a comfortable fit and elbow strap for customized compression
How to Wear a Double Compression Shoulder Sleeve with Straps?
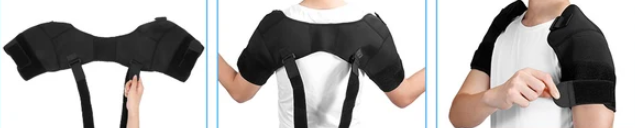
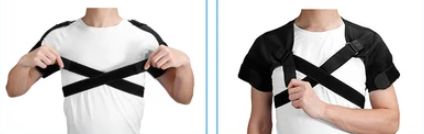
- Make the shoulder brace spread out
- WWear the shoulder brace like a backpack
- Adjust the velcro on the left and right arms to ensure secure fit
- Pull both long straps to the front and cross them
- Adjust shoulder straps until the position is correct
How to Apply a Triangular Bandage Sling (First Aid Method)
A triangular bandage is the original arm sling—no buckles, no Velcro, just fabric and a knot. You’ll most need this in emergencies: car accidents, hiking falls, sports injuries where a ready-made sling isn’t in reach. It’s the sling and swathe technique first responders learn first, and it works as well in your living room as on a trail.
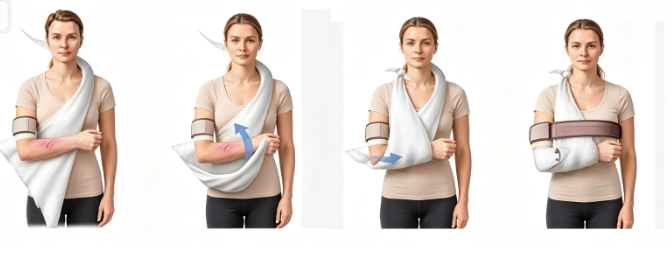
Step 1: Support the arm. Have the injured person hold their forearm across their chest with the uninjured hand, or support it yourself if they can’t.
Step 2: Position the bandage. Slide the triangular bandage underneath the injured arm. The point of the triangle should land right below the elbow.
Step 3: Bring the top corner up and over. Take the upper corner and drape it over the shoulder on the uninjured side, running it behind the neck.
Step 4: Fold the bottom corner up. Wrap the lower corner up and over the forearm so it meets the other end near the shoulder, cradling the arm at roughly a right angle.
Step 5: Tie above the collarbone. Knot both ends with a reef knot—right over left and tuck, then left over right and tuck. Position this knot just above the collarbone, not at the center back of the neck. That placement avoids pressing on the cervical spine and sits more comfortably.
Step 6: Secure the elbow edge. Loose fabric at the elbow lets the arm slip. Either pin the fold with a safety pin for a fast, secure fix, or twist the excess material and tuck it in—no pin needed, though it holds less firmly.
Getting the Fit Right
Getting the sling on is only half the job. A poorly fitted sling can do as much harm as no sling at all, so run through this checklist before you call it done.
Elbow Depth: The Foundation of a Good Fit
Your elbow should sit fully in the back corner or pocket of the sling, not perched at the edge. Check the elbow tip. If it’s touching the deepest part of the fabric, you’re set. If it’s hovering, pressing against the rim, or the forearm keeps sliding downward, the fit is off. Push the elbow back further into that corner and readjust the shoulder strap.
Hand Position: Slightly Higher Than the Elbow
The hand should rest just above elbow level, with the arm bent to roughly 90 degrees and the forearm close to parallel with the ground.
Keep fingers visible. Don’t tuck them inside the fabric. Exposed fingers let you monitor circulation and nerve function—color, temperature, movement, and how fast color returns after pressing a nail. Pale, blue, cold, or numb fingers mean the sling needs to come off and be checked immediately.
The 2-3 Finger Rule for Strap Tightness
Most sling problems are size problems. Get the fit wrong and you’ll spend the next few days fighting the fabric instead of healing.
A sling too big shows up fast: the wrist droops, the elbow won’t settle into the sling’s bottom corner, and the forearm swings when you walk. If the hand can’t sit slightly above the elbow, the sling’s too long.
A sling too small looks different—fingers can’t move, red marks form at the neck, and the fabric edge digs into the palm or wrist. Cold fingers, numbness, or a bluish tint mean it’s cutting off circulation.
Fix both by repositioning the elbow into the pocket, then shortening or lengthening the shoulder strap until the sling’s bottom edge lands at the base of the pinky, with the hand tilted slightly upward.
Slide two to three fingers flat between the shoulder strap and your neck or shoulder skin. That should fit comfortably. One finger or less means it’s too tight. A big gap or a strap that sags means it’s too loose.
Watch for red marks, numbness, or pain around the neck. Those are signs to loosen up right away. Stand relaxed and glance down. The forearm should be parallel to the floor, hand slightly higher than elbow. Hand drooping? Shorten the strap. Shoulder hiked up or elbow uncomfortable? Lengthen it and reseat the elbow.
Watch the Strap and the Fabric Coverage
A twisted shoulder strap digs into skin like a rope. Untwist it and move the knot above the collarbone, never at the back of the neck.
Covering the fingers entirely is the most dangerous mistake. Fingertips need to stay visible so you or a caregiver can check color and warmth at a glance. Hide them, and you lose your earliest warning sign that circulation is failing.
FAQ: Common Questions About Arm Sling Application
Real questions come up once the sling’s actually on. Here’s what people ask most.
How long should I wear an arm sling?
Depends on what’s injured. Shoulder dislocations need 2–4 weeks, fractures run 4–8 weeks, and elbow or wrist injuries fall around 2–6 weeks. Rotator cuff repairs and proximal humerus fractures often require 6 weeks, with major surgical repairs sometimes needing 5–6 weeks of near-constant wear. Follow your clinician’s timeline over any general rule.
Can I make a homemade arm sling?
Yes, but treat it as an emergency stopgap. A large scarf, triangular bandage, or even a jacket works. Fold a roughly 40-inch square cloth into a triangle, position the hand slightly higher than the elbow, and tie behind the neck. Recheck fit every 15–30 minutes during that first hour.
How do I safely remove the sling?
Wean gradually. One common progression drops daily wear from 80% to 60% to 40% across several weeks. Support the arm with your other hand, loosen straps slowly, and slide out gently—no sudden drops.
Conclusion
Getting an arm sling right comes down to three things: the right type based on your injury, the correct 90-degree elbow angle, and a snug-but-not-too-tight fit. Whether you’re working with a ready-made sling or fashioning one from a triangular bandage in a pinch, the goal is the same—stabilize the injury, ease the strain on your shoulder and arm, and give your body the conditions it needs to recover.
Even the best shoulder and arm brace won’t do its job if wearing it in the wrong way. Now choose a OEM/ODM shoulder braces manufacturer who can give you detailed branding and complete introduction info. AOFIT, your reliable medical brace manufacturer, designs and makes shoulder braces around patients’ frustrations and gives you the most clear wearing way.